
Our Artwork Requirements
This page contains detailed explanations of our artwork requirements. If it is your first time ordering with us we recommend reading through these requirements carefully.
If you have any questions or cannot find what you are looking for, please send us a message through our contact us form and a member of our team will get back to you promptly.
What type of files do you accept?
What type of files do you accept?
Where possible, we always prefer press ready PDF files.
For a full list of the file types we can accept, please see below:
- Adobe Acrobat PDF (.pdf)
- Illustrator files (.ai)
- Photoshop files (.psd)
- InDesign files with all links and fonts embedded (.indd or .idml)
- EPS files
- Word Documents (.doc, .docx) [Please note that Word does not allow you to save high resolution images or to use external bleed]
- Publisher files (.pub)
- Image file formats (.bmp, .tiff, .jpeg, .png, etc…)
What file sizes do you accept?
The maximum file size that we accept is 500 megabytes.
Do you have guideline templates?
Yes, we certainly do. Please click here to view our extensive range of guideline templates. When using the templates please ensure you read the ‘read me file’ first which contains detailed instructions.
What artwork sizes do you offer?
Please find a list of the size specifications we offer (in millimeters) below:
Standard (Click to Expand)
| A6 | 105 x 148 (finished size) |
111 x 154 (inc 3mm external bleed) |
|
| DL | 99 x 210 (finished size) |
105 x 216 (inc 3mm external bleed) |
109 x 220 (inc 5mm external bleed) |
| A5 | 148 x 210 (finished size) |
154 x 216 (inc 3mm external bleed) |
158 x 220 (inc 5mm external bleed) |
| A4 | 210 x 297 (finished size) |
216 x 303 (inc 3mm external bleed) |
220 x 307 (inc 5mm external bleed) |
| A3 | 297 x 420 (finished size) |
303 x 426 (inc 3mm external bleed) |
|
| A2 | 420 x 594 (finished size) |
426 x 600 (inc 3mm external bleed) |
|
| A1 | 594 x 840 (finished size) |
600 x 846 (inc 3mm external bleed) |
|
| A0 | 840 x 1189 (finished size) |
846 x 1195 (inc 3mm external bleed) |
Business Cards (Click to Expand)
| Bus Cards Square Corners | 55 x 90 (finished size) |
61 x 96 (inc 3mm external bleed) |
|
| Bus Cards Round Corners | 50 x 86 (finished size) |
56 x 92 (inc 3mm external bleed) |
Envelopes (Click to Expand)
| DL Envelopes | 110 x 220 (finished size) |
Bleed not possible | |
| DLX Envelopes | 120 x 235 (finished size) |
Bleed not possible | |
| C5 Envelopes | 162 x 229 (finished size) |
Bleed not possible | |
| C4 Envelopes | 229 x 324 (finished size) |
Bleed not possible | |
| B4 Envelopes | 250 x 353 (finished size) |
Bleed not possible |
Outdoor Stickers - Rectangle (Click to Expand)
| 55 x 90 (finished size) |
61 x 96 (inc 3mm external bleed) |
| 55 x 130 (finished size) |
61 x 136 (inc 3mm external bleed) |
| 90 x 110 (finished size) |
96 x 116 (inc 3mm external bleed) |
| 100 x 100 (finished size) |
106 x 106 (inc 3mm external bleed) |
| 50 x 200 (finished size) |
56 x 206 (inc 3mm external bleed) |
| 90 x 230 (finished size) |
96 x 236 (inc 3mm external bleed) |
| 70 x 300 (finished size) |
76 x 306 (inc 3mm external bleed) |
| 150 x 150 (finished size) |
156 x 156 (inc 3mm external bleed) |
| 90 x 300 (finished size) |
96 x 306 (inc 3mm external bleed) |
| 150 x 230 (finished size) |
156 x 236 (inc 3mm external bleed) |
| 450 x 600 (finished size) |
456 x 606 (inc 3mm external bleed) |
| 600 x 900 (finished size) |
606 x 906 (inc 3mm external bleed) |
| 900 x 1200 (finished size) |
906 x 1206 (inc 3mm external bleed) |
Outdoor Stickers - Oval (Click to Expand)
| 50 x 70 (finished size) |
56 x 76 (inc 3mm external bleed) |
| 90 x 110 (finished size) |
56 x 76 (inc 3mm external bleed) |
Outdoor Stickers - Round (Click to Expand)
| 60 x 60 (finished size) |
66 x 66 (inc 3mm external bleed) |
| 80 x 80 (finished size) |
86 x 86 (inc 3mm external bleed) |
Invoice/ Quote Books (Click to Expand)
| A4 Carbonless Books (Tear off size) | 210 x 297 (finished size) |
Bleed not possible |
| Portrait Bound at the LHS | 225 x 297 (finished size) |
Bleed not possible |
| Portrait Bound at the Head | 210 x 312 (finished size) |
Bleed not possible |
| A4 Carbonless Pads | 210 x 297 (finished size) |
Bleed not possible |
| A5 Carbonless Books (Tear off size) | 148 x 210 (finished size) |
Bleed not possible |
| Portrait Bound at the LHS | 163 x 210 (finished size) |
Bleed not possible |
| Portrait Bound at the Head | 148 x 225 (finished size) |
Bleed not possible |
| A5 Carbonless Pads | 148 x 210 (finished size) |
Bleed not possible |
| DL Carbonless Books (Tear off size) | 210 x 99 (finished size) |
Bleed not possible |
| DL Carbonless Pads | 210 x 99 (finished size) |
Bleed not possible |
| A6 Carbonless Books (Tear off size) | 105 x 148 (finished size) |
Bleed not possible |
| Portrait Bound at the LHS | 120 x 148 (finished size) |
Bleed not possible |
| Portrait Bound at the Head | 105 x 163 (finished size) |
Bleed not possible |
| A6 Carbonless Pads | 105 x 148 (finished size) |
Bleed not possible |
Corflutes (Click to Expand)
| 420 x 594 (finished size) |
426 x 600 (inc 3mm external bleed) |
| 594 x 840 (finished size) |
600 x 846 (inc 3mm external bleed) |
| 840 x 1189 (finished size) |
846 x 1195 (inc 3mm external bleed) |
| 450 x 600 (finished size) |
456 x 606 (inc 3mm external bleed) |
| 600 x 900 (finished size) |
606 x 906 (inc 3mm external bleed) |
| 900 x 1200 (finished size) |
906 x 1206 (inc 3mm external bleed) |
Pull Up Banners (Click to Expand)
| 845 x 2000 (finished size) |
855 x 2110 (inc 5mm external bleed). Please see detailed requirements here. |
| 1195 x 2000 (finished size) |
1205 x 2110 (inc 5mm external bleed) Please see detailed requirements here. |
Outdoor Banners (Click to Expand)
| 500 x 1000 (finished size) |
550 x 1050 (inc 25mm external bleed) |
| 1000 x 2000 (finished size) |
1050 x 2050 (inc 25mm external bleed) |
| 1000 x 3000 (finished size) |
1050 x 3050 (inc 25mm external bleed) |
| 2400 x 2400 (finished size) |
2450 x 2450 (inc 25mm external bleed) |
| 1300 x 5000 (finished size) |
1350 x 5050 (inc 25mm external bleed) |
X-Banners (Click to Expand)
| 600 x 1600 (finished size) |
620 x 1620 (inc 10mm external bleed) |
A-Frames (Click to Expand)
| 600 x 900 (finished size) |
606 x 906 (inc 3mm external bleed) |
Stick-It Posting Notes (Click to Expand)
| 75 x 75 (finished size) |
81 x 81 (inc 3mm external bleed) |
| 75 x 100 (finished size) |
81 x 106 (inc 3mm external bleed) |
| 75 x 125 (finished size) |
81 x 131 (inc 3mm external bleed) |
| 100 x 150 (finished size) |
106 x 156 (inc 3mm external bleed) |
Presentation Folders (Click to Expand)
| Offset- Type 1 | 523 x 396 (flat size) | 533 x 406 (inc 5mm external bleed) |
| Offset- Type 2 | 532 x 400 (flat size) | 542 x 410 (inc 5mm external bleed) |
| Offset- Type 3 | 595 x 396 (flat size) | 605 x 406 (inc 5mm external bleed) |
| Digital- Type 5 | 544 x 407 (flat size) | 554 x 417 (inc 5mm external bleed) |
| Digital- Type 6 | 520 x 391 (flat size) | 530 x 401 (inc 5mm external bleed) |
Greeting Cards (Click to Expand)
| A5 fold to A6 | 148 x 210 (flat size) |
154 x 216 (inc 3mm external bleed) |
| 4pp DL fold to DL | 210 x 198 (flat size) |
216 x 204 (inc 3mm external bleed) |
| A4 fold to A5 | 210 x 297 (flat size) |
216 x 303 (inc 3mm external bleed) |
| 4pp 148mm Square folded | 148 x 296 (flat size) |
154 x 302 (inc 3mm external bleed) |
Mouse Pads (Click to Expand)
| 205 x 145 (finished size) |
211 x 151 (inc 3mm external bleed) |
| 225 x 150 (finished size) |
231 x 156 (inc 3mm external bleed) |
| 235 x 190 (finished size) |
241 x 196 (inc 3mm external bleed) |
Folding Brochures (Click to Expand)
| A4 fold to DL | 210 x 297 (flat size) |
216 x 303 (inc 3mm external bleed) |
| A4 fold to A5 | 210 x 297 (flat size) |
216 x 303 (inc 3mm external bleed) |
| 4pp DL fold to DL | 210 x 198 (flat size) |
216 x 204 (inc 3mm external bleed) |
| A3 fold to A4 | 297 x 420 (flat size) |
303 x 426 (inc 3mm external bleed) |
| A3 crash fold to DL | 297 x 420 (flat size) |
303 x 426 (inc 3mm external bleed) |
| 8pp DL fold to DL | 210 x 396 (flat size) |
216 x 402 (inc 3mm external bleed) |
| 6pp A4 fold to A4 | 297 x 630 (flat size) |
303 x 636 (inc 3mm external bleed) |
Indoor Stickers - Rectangle (Click to Expand)
| 25 x 50 (finished size) |
31 x 56 (inc 3mm external bleed) |
| 34 x 51 (finished size) |
40 x 57 (inc 3mm external bleed) |
| 50 x 50 (finished size) |
56 x 56 (inc 3mm external bleed) |
| 34 x 65 (finished size) |
40 x 71 (inc 3mm external bleed) |
| 34 x 75 (finished size) |
40 x 81 (inc 3mm external bleed) |
| 46 x 73 (finished size) |
52 x 79 (inc 3mm external bleed) |
| 51 x 75 (finished size) |
57 x 81 (inc 3mm external bleed) |
| 60 x 80 (finished size) |
66 x 86 (inc 3mm external bleed) |
| 80 x 80 (finished size) |
86 x 86 (inc 3mm external bleed) |
| 90 x 55 (finished size) |
96 x 61 (inc 3mm external bleed) |
| 50 x 145 (finished size) |
56 x 151 (inc 3mm external bleed) |
| 74 x 105 (finished size) |
80 x 111 (inc 3mm external bleed) |
| 89 x 113 (finished size) |
95 x 119 (inc 3mm external bleed) |
| 80 x 125 (finished size) |
86 x 131 (inc 3mm external bleed) |
| 140 x 140 (finished size) |
146 x 146 (inc 3mm external bleed) |
| 105 x 148 (finished size) |
111 x 154 (inc 3mm external bleed) |
| 97 x 150 (finished size) |
103 x 156 (inc 3mm external bleed) |
| 54 x 200 (finished size) |
60 x 206 (inc 3mm external bleed) |
| 100 x 200 (finished size) |
106 x 206 (inc 3mm external bleed) |
| 99 x 210 (finished size) |
105 x 216 (inc 3mm external bleed) |
| 113 x 183 (finished size) |
119 x 189 (inc 3mm external bleed) |
| 148 x 210 (finished size) |
154 x 216 (inc 3mm external bleed) |
| 89 x 230 (finished size) |
95 x 236 (inc 3mm external bleed) |
| 200 x 295 (finished size) |
206 x 301 (inc 3mm external bleed) |
| 210 x 297 (finished size) |
216 x 303 (inc 3mm external bleed) |
| 300 x 445 (finished size) |
306 x 451 (inc 3mm external bleed) |
Indoor Stickers - Oval (Click to Expand)
| 48 x 88 (finished size) |
54 x 94 (inc 3mm external bleed) |
| 60 x 100 (finished size) |
66 x 106 (inc 3mm external bleed) |
| 100 x 130 (finished size) |
106 x 136 (inc 3mm external bleed) |
Indoor Stickers - Round (Click to Expand)
| 25 x 25 (finished size) |
31 x 31 (inc 3mm external bleed) |
| 30 x 30 (finished size) |
36 x 36 (inc 3mm external bleed) |
| 32 x 32 (finished size) |
38 x 38 (inc 3mm external bleed) |
| 45 x 45 (finished size) |
51 x 51 (inc 3mm external bleed) |
| 50 x 50 (finished size) |
56 x 56 (inc 3mm external bleed) |
| 60 x 60 (finished size) |
66 x 66 (inc 3mm external bleed) |
| 65 x 65 (finished size) |
71 x 71 (inc 3mm external bleed) |
| 80 x 80 (finished size) |
86 x 86 (inc 3mm external bleed) |
| 90 x 90 (finished size) |
96 x 96 (inc 3mm external bleed) |
| 112 x 112 (finished size) |
118 x 118 (inc 3mm external bleed) |
| 140 x 140 (finished size) |
146 x 146 (inc 3mm external bleed) |
| 200 x 200 (finished size) |
206 x 206 (inc 3mm external bleed) |
Magnets (Click to Expand)
| 50 x 200 (finished size) |
56 x 206 (inc 3mm external bleed) |
| 55 x 250 (finished size) |
61 x 256 (inc 3mm external bleed) |
Plastic Cards (Click to Expand)
| 54 x 85.5 (finished size) |
64 x 95.5 (inc 5mm external bleed) |
| 54 x 86 (finished size) |
64 x 96 (inc 5mm external bleed) |
Bookmarks (Click to Expand)
| 50 x 200 (finished size) |
56 x 206 (inc 3mm external bleed) |
| 55 x 250 (finished size) |
61 x 256 (inc 3mm external bleed) |
What type of black do you recommend I use in my artwork?
Fine Black Lines & Text
We recommend that fine black text & lines are set to: C=0%, M=0%, Y=0%, K=100%. Where possible, such text & lines should also be set to overprint.

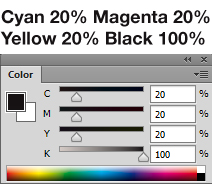
Rich Black
For a full rich black we recommend you use the combination of: C=20%, M=20%, Y=20%, K=100%. Rich black should only be used for areas 30mm square or larger, excluding text. These areas should not be set to overprint.
Photoshop Default Black
Please do not use Photoshop Default Black in your artwork (C=75%, M=68%, Y=67%, K=90%). It is suitable for web sites & screen presentations; however it is not appropriate for commercial printing.

Setting up Bleed
Do I need to include bleed with my artwork?
For borderless printing files must be set up with the correct internal and external bleed. The bleed requirements vary for individual products. To obtain the correct internal and external bleed requirements for the product you are ordering, please refer to our guideline templates. A general guide can be found below.
Internal Bleed means all text & important graphics must be kept the minimum distance away from the trim edge to ensure these elements are not trimmed off.
External bleed is the area extending past the trim line which allows for a small amount of movement that may occur when your order is being cut to size. All elements which extend to the trim edge must also extend to the external bleed margin.
General Internal and External Bleed Requirements:
- Most products require 3mm of internal and external bleed.
- Magazines, Booklets, Plastic Loyalty Cards, Mouse Pads and Presentation Folders require 5mm of internal and external bleed
- Outdoor Banners require 25mm of internal and external bleed.
- X-Banners and Pull Up Banners have more specific bleed requirements and detailed instructions can be found in our guideline templates.
Please click here to download our guideline templates (please ensure you read the instructions file first.)
For further information, please refer to the following diagram below with an example of correct 3mm of internal and external bleed.


Setting up artwork for case bound books with ultra thick covers
Case binding produces premium quality beautiful hard cover books.
When creating artwork for case bound books, it is super important that all customers read and view our artwork instructions.
If you are not experienced in preparing this type of artwork for commercial printing, we recommend that you also consult with a graphic designer.
Please click on the button below for our detailed artwork instructions:
Preparing artwork for products with Custom Cutting / Die Cutting
If you are ordering a product that contains die cutting, or is cut to a custom shape, please follow the steps below to set up your artwork. Please navigate to our Guideline Templates page if you wish to download PDF instructions on how to set up your artwork for custom cutting / die cutting.
Important notes:
Custom cutting / die cutting can only be created & setup in Adobe InDesign or Adobe Illustrator.
If you don’t have either of these programs but:
- You have finished artwork and it contains vector (editable) cut-lines / die-lines, please select the Check and Make Press Ready service when placing your order. We will then amend your artwork and cut-lines / die-lines to be press ready for you.
- If you don’t have finished artwork please select the Affordable Design service when placing your order and we will create your artwork and the cut lines / die-lines for you.
- If you have finished artwork, but it contains rasterized (or un-editable) cut-lines / die-lines, or it does not contain any cut-lines / die-lines at all, please contact us and ask for a custom quote on creating the cut-lines / die-lines for you.
Internal Bleed
Custom cutting / die cutting requires 3mm internal bleed on all sides.
External Bleed
Custom cutting / die cutting requires 3mm external bleed on all sides.
Borders
We recommend that all borders (including partial borders/strips) are at least 5mm in width and/or placed 5mm inside the trim edge on all sides.
Instructions for setting up Custom Cutting / Die Cutting Artwork:
- Create a new layer exclusively for your custom cutting / die cutting effects. On this layer, set up the lines to be cut, perforated and or scored. No other elements should be on this layer.
Please use solid lines for cutting and scoring and dashed lines for perforating. - Create a new colour swatch for each effect you are using (e.g. cutting, perforating, or scoring).
The naming and set-up of the swatches is critical. If they are not named exactly as shown below, your cut/perf/score lines may not be read by our machines correctly.
-
-
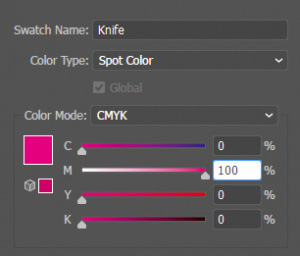
- The cutting swatch must be named as: Knife
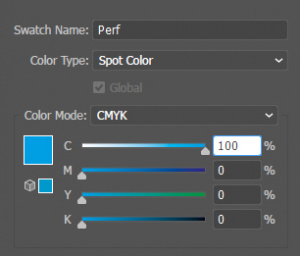
- The perforating swatch must be named as: Perf
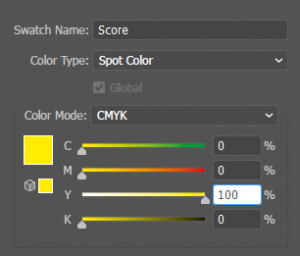
- The scoring swatch must be named as: Score
-
For all swatches, select colour type ‘Spot Colour’ and colour mode as CMYK. Ensure that the colour breakdown of the swatch is 100% only of either C, M, Y or K. Please use a different colour breakdown for each effect (e.g. cutting, perforating & scoring) to make them easier to see.
- Apply the new colour swatches to the lines on your custom cutting / die cutting layer. E.g. apply the ‘Knife’ swatch to all lines which are to be cut, the ‘Perf’ swatch to all lines which are to be perforated and the ‘Score’ swatch to all lines which are to be scored.
- Select all lines on the custom cutting / die cutting layer and set them to “Overprint Stroke” in the Attributes palette:
- Adobe InDesign: Window > Output > Attributes
- Adobe Illustrator: Window > Attributes
Saving artwork & Supplying your Files
With the custom cutting/die cutting layer layer turned ON and the other layers turned off, save the Die-Cutting artwork.With the CMYK artwork layers turned ON and Die-Cutting layer turned off, save the Front and Back artwork.
Your custom cutting / die cutting layer must be supplied as a separate file from your front and back artwork.
E.g. for custom cut double sided business card you would supply 3 files:- The FRONT of the Business Card
- The BACK of the Business Card
- The Custom Cutting / Die Cutting Layer
Please click here to navigate to our Guideline Templates page to download our PDF instructions on how to setup custom cutting / die cutting artwork.
Setting up Borders
Do you have borders (including partial borders or strips) in your artwork?
We recommend for most products that borders (including partial borders/strips) are at least 5mm in width and/or placed 5mm inside the trim edge. On Custom Die-Cutting and Stickers on Rolls the borders can be 3mm in width and/or placed 3mm inside the trim edge.
Borders can be made from strips of colour, solid elements, lines/strokes, text and other design elements. Please refer to the examples shown below.
Narrow borders, or borders placed too close to the edge of your design may result in uneven borders after printing/trimming. Please note: Borders are not the same as internal bleed.
Setting Up artwork for Borders:
Please ensure that all borders (including partial borders/strips) are at least 5mm in width and/or placed 5mm inside the trim edge on all sides (3mm in width and/or placed 3mm inside the trim edge on all sides for Custom Die-Cutting and Stickers on Rolls).
There is no guideline supplied on our templates for borders. We recommend that you create a guideline for your borders or manually place them the correct measurement inside the trim edge on all sides.
Please note: We advise against using borders (including partial borders/strips) on products which are smaller than 90mm. E.g. We don’t recommend using borders on Business Cards, Bookmarks, Plastic Cards, and small stickers.

Understanding Crop Marks
What are Crop Marks?
Crop marks, also known as trim marks, are thin lines printed in the corners of a document to indicate where the paper should be trimmed after printing.
Do I need to I need to include crop marks in my supplied artwork?
No, you don’t have to provide crop marks on your supplied artwork as long as your artwork is correctly sized with correctly bleed. You can include crop marks if you wish however please ensure that they are never flattened onto your artwork or placed in the incorrect position.
What is extra white ‘border’ and text along the top of my Soft PDF Proof?
Our Soft PDF Proofs always include Crop Marks to indicate where your printing is to be trimmed and a file name (for our reference) outside the bleed area. The white area and text (outside the trim marks) although visible in your Soft PDF Proof, will not be visible on your finished items. Only elements which are inside the trim marks will be visible on your finished items.
Setting up artwork for Eyelets
If you choose to include Eyelets with your Corflutes or Outdoor Banners your artwork will need to be set up with an appropriate clear space area so that nothing important is lost in the eyelet area.
Corflutes require 45mm of clear space inside each corner to allow space for the eyelets.
Outdoor Banners require 50mm of clear space inside each eyelet area. Further Outdoor Banner Information can be found here.
Please ensure that no logo’s or other important elements are included within the eyelet areas.

Setting up artwork for envelopes
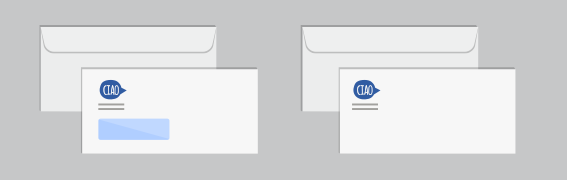
When ordering envelopes it is important all artwork is created correctly and as per our print specifications.
To download our Envelope guideline templates please click here.
Please note, Envelopes with coverage of 25% or more will incur a surcharge.
For our detailed explanations on how to set up Envelope artwork please click the button below:
Folding Information
Please use the info-graphic shown below to help you choose the right folded brochure for your current project:

When creating artwork for folded brochures, it is extra important that you set the panel orientations and the fold or score positions correctly.
To make this easy, we provide explanations, diagrams and guideline templates for all our folded products.
These can be found by clicking the button below:
How to set up your text and lines correctly
What is the minimum line thickness I should use?
All lines in your artwork should be at least 0.3pt or 0.1mm in width.
(lines that are a light colour, or reversed out of a solid block of colour should be thicker where possible)
What is the minimum font size/thickness?
Where possible, text should be at least 8pt using a non narrow or non ultra-light or ultra-thin font.
Small sized text written in narrow, ultra-light and ultra-thin fonts (e.g. Helvetica Ultra-Light, Code Pro Light) tend to break up into small dashes and dots or to fill in when reversed out of a solid colour.

Both of these results can render the text very difficult to read. For this reason we strongly recommend against using such fonts for small text sizes.
Unfortunately CMYK Colour Online will not accept responsibility for such outcomes if you choose to use narrow, ultra-light or ultra-thin fonts in your artwork.
What black should I use for my fonts & lines?
We recommend all fine black text or lines are set to: C=0%, M=0%, Y=0%, K=100%. All such text or lines should also be set to overprint.
What thickness should my borders be?
Please ensure all borders and narrow strips around the outside of your design are at least 5mm wide and or 5mm in from the trim edge.
If you use narrow borders or strips in your design, due to trimming variance, they may appear uneven after trimming.
Considering this, we strongly advise against using borders or narrow strips on small printed items less than 90x90mm in size (e.g. business cards).
How should the fonts in my artwork be supplied?
Please ensure all fonts in your artwork are embedded. If this is not possible please ensure fonts are outlined (converted to curves).
How to setup gradients
For best printing results, and to reduce the possibility of banding we recommend that gradients are created in Photoshop.
Please follow our instructions below:
- In Photoshop, use the gradient tool (g) to create your gradient. Gradients should be created at finished size at 300dpi.
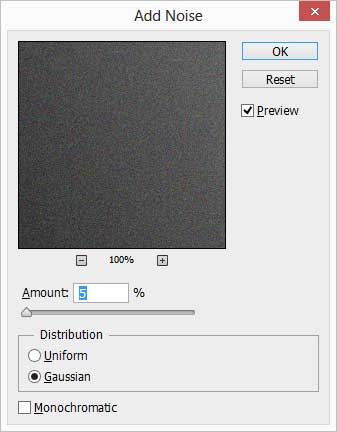
- Once you have created your gradient click Filter>Noise>Add Noise. (We recommend 3-5% Noise)
- Then click Filter>Blur>Gaussian Blur. (We recommend 3-5 pixel blur)

- Save your gradient as a PSD or EPS file before placing into your artwork.
How to ensure your images are the correct resolution
Are my images high enough resolution?
A common printing mistake is to set the image resolution too low or too high.
An image with a resolution that is too low will result in an inferior print that will likely look blurry or pixelated. A resolution that is too high will increase overall file size without actually increasing the print quality.
We recommend all images in your artwork are set to 300dpi when placed at 100% size.
If my image is a large file size does that mean it is high enough resolution?
Unfortunately file size and resolution are not the same thing. Just because an image is a large file size does not necessarily mean it is high enough resolution.
To check the resolution of an image, you will need to view its properties. Please view the properties after stretching or resizing the image to its final size as stretching or resizing an image may change its resolution.
Please note that increasing the dpi of an image in Photoshop does not increase the resolution of an image.
Setting up Artwork for carbonless books and pads

To setup artwork correctly for carbonless books & pads, we recommend all customers follow our print specifications.
For guideline templates please click here. Before using our templates, please ensure you always read the “read me” file first.
Please note, external bleed is not possible on Carbonless Books/ Pads.
For detailed explanations on how to set up carbonless books & pads artwork please click the button below:
Do you require lines on your notepads?
If you require lines to be printed on your notepads for writing, these lines need to be included in the design of your supplied artwork. If lines are not supplied in your artwork, the notepads will not have lines printed.
What is Knockout?
In commercial printing, when elements are set to knockout, they don’t print on top of each other. The bottom elements are knocked out (not printed) wherever elements overlap.
Therefore, when knocked out elements overlap, only the top element will be visible as any element’s placed underneath will not be printed.
Knockout prevents overlapping colours from mixing together which can cause unexpected results such as colours blending together to form new colours, or colours appearing muddy or overly saturated.

Example of Knockout:
The magenta circle is set to knockout. Because of this, all colours beneath the magenta circle are not printed. This means the colour of the magenta circle is not affected by the colours of the background elements underneath.
What is Overprint?
In commercial printing, overprinting is the opposite of knockout. When elements are set to overprint, they will be printed on top of each other.
Because of this, when overprinted elements overlap, the colours of the elements underneath will affect, blend with and change the colours of the elements above them.
Although overprinting can be used to create new colours and interesting effects, it can also make colours look muddy, oversaturated and achieve unexpected results.
For example, if a white element is set to overprint it will not be visible in the final printing.
When white is overprinted the elements underneath are not knocked out (not printed). Therefore the space the white element would normally fill is taken up by the element’s underneath. This results in the white element disappearing from the final printing.

Example of Overprint:
The magenta circle is set to overprint. Because of this, the magenta circle is printed directly on top of the background elements. This means the colour of the background elements affects the colour of the magenta circle.
When it is turned on unintentionally or by accident, overprinting is a common mistake which can result in the final printed product looking different to what is expected.
Unless you are a highly experienced graphic designer skilled in the use of overprint, we recommend you do not use this effect in your artwork, with the exception of:
How to Check for Overprint:
We recommend checking your artwork in the ‘Overprint Preview’ function of your design program before supplying your artwork. This function will simulate how your artwork will appear once printed.
- Adobe InDesign (View > Overprint Preview)
- Adobe Illustrator (View > Overprint Preview)
We also recommend checking your soft PDF proof for overprinting before approving it to print.
- Adobe Acrobat Pro (Tools > Print production > Output preview > Color warnings > Tick the Show Overprinting box)
Please note, as overprinting is a legitimate printing effect, we do not check for overprinting elements in your artwork. We cannot be held responsible for detecting potential issues with overprinting elements or the subsequent printing results should elements be set to overprint in your artwork.
InDesign Default Black:

The InDesign default [Black] swatch is automatically set to overprint.
Please keep this in mind when creating your artwork using InDesign and ensure that this swatch is only used for small or fine black text.
If the default [Black] swatch is used for other elements in your design (such as shapes, blocks, backgrounds, etc..) they will be automatically set to overprint.
To avoid this, we recommend creating a rich black swatch (C:20%, M:20%, Y:20%, K100%) to be used for all blocks of black colour in your design.
Setting up artwork for perfect binding

Perfect binding is a form of booklet making in which all pages are bound along the spine using special adhesive.
When creating artwork for perfect bound books, it is super important that all customers read and view our artwork instructions.
If you are not experienced in preparing this type of artwork for commercial printing, we recommend that you also consult with a graphic designer.
Please click on the button below for our detailed artwork instructions:
Setting up artwork for plastic loyalty cards
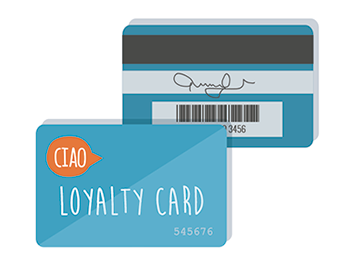
Our plastic loyalty cards are printed on 0.75mm high quality PVC plastic with rounded corners. Cards are printed double sided and can include any of the following additional features:
- Magnetic strip (without encoding) Lo-Co
- Signature Panel
- Scratch Panel
- Embossed Numbers
- Barcodes
For guideline templates please click here. Before using our templates, please ensure you always read the “read me” file first.
For detailed instructions on how to correctly supply artwork for plastic loyalty cards please click the button below:
PP (printed pages)
What does PP mean?
PP = printed pages. When we refer to PP, we are referring to the number of printed pages, not the number of sheets of paper.
E.g. An 8pp A4 saddle stitched magazine is 2 x A3 sheets, double sided, folded and saddle stitched to A4.
If you require more information, please contact us by clicking here.
Setting up artwork for presentation folders

When ordering presentation folders, our guideline templates must be used to create ALL artwork.
Guideline templates can be found by clicking here and selecting the style & option you require. Before using our templates, please make sure you read the “read me” file first.
Please click on the button below for our detailed artwork instructions:
Setting up artwork for Pull Up Banners
Pull Up Banners have specific size and bleed requirements.
The finished visible size of Pull Up Banners is 845 x 2000mm.
Artwork must be supplied at 845 x 2100mm PLUS 5mm of external bleed on all edges.
This equates to artwork that needs to be supplied at 855 x 2110mm.
We also have a safe print margin inside the trim edge. This means that no logo, text or important element which you don’t wish to risk being trimmed off should be placed here:
- TOP: 10mm inside trim edge
- LEFT+RIGHT: Both 10mm inside trim edge
- BOTTOM: 90mm
Please click on the button below for our diagrams and detailed artwork instructions:
The difference between RGB, CMYK and Pantone Colours
What is the difference between RGB and CMYK?
RGB (Red, Green, Blue) is the colour language of computer monitors, domestic scanners and domestic printers. CMYK (Cyan, Magenta, Yellow and Black) is the colour language of commercial printing equipment and presses.
We only print full colour work in CMYK and strongly recommend that artwork is supplied in CMYK.
If you upload files that are not CMYK (e.g. RGB colours) they will be converted to CMYK by our automated pre-press processes. This conversion can slightly change colours and they may appear different from what is seen on screen. CMYK Colour Online will not accept responsibility for the outcome of such files.
For the best result we recommend using the ISO coated v2 300% (ECI) Colour profile. Our Distiller options file can be downloaded from our website here.
Please view the chart below for approximate conversions of common CMYK and RGB Colours:

What are Pantone Colours (PMS Colours)?

PMS stands for Pantone Matching System. PMS colours are standardized colours listed in the Pantone Colour Matching System. Each Pantone colour has a specific code which different printers and manufacturers can refer to in order to ensure colour consistency.
Please note, we offer printing using PMS colours for our envelopes, stick-it notes and carbonless books.
To download a chart of PMS Colours please click here.
What is the maximum ink coverage I can use in my artwork?
The maximum ink coverage is 300% for coated stocks and 260% for uncoated stocks. If you add up the cyan, magenta, yellow and black percentages, the total sum should be less than 300% (or 260%)
Setting up artwork for saddle stitching

Saddle stitching is a form of binding in which all pages are bound in the center of the booklet from the outside in using wire staples. Saddle stitching is ideally suited to booklets or magazines in the 8pp to 80pp range.
We strongly recommend using our free guideline templates to design your artwork. Before using our templates, please ensure you always read the “read me” file first.
For our detailed explanations on how to set up saddle stitched artwork please click the button below:
Preparing artwork for products with Special Effects & Embellishments
Fore more information on the special effects and embellishments that we offer, please click here.
If you are ordering a product with an embellishment or special effect, please follow the steps below to set up your artwork. Please navigate to our Guideline Templates page if you wish to download PDF instructions on how to set up your artwork for special embellishments or effects.
Important notes:
Special effects and embellishments can only be created & setup in Adobe InDesign or Adobe Illustrator.
If you don’t have either of these programs but:
- You have finished artwork which contains the embellishments or special effects as a vector (editable) objects, please select the Check and Make Press Ready service when placing your order. We will then amend your artwork and special effects & embellishments to be press ready for you.
- If you don’t have finished artwork please select the Affordable Design service when placing your order and we will create your artwork for you (this includes us setting up the artwork for the special effects & embellishments for you).
- If you have finished artwork, but it contains embellishments or special effects as rasterized (or un-editable) objects, or if your artwork is not setup for embellishments or special effects at all, please contact us and ask for a custom quote on creating the special effects & embellishments for you.
Internal Bleed
Printing with special effects & embellishments requires 3mm internal bleed on all sides.
External Bleed
Printing with special effects & embellishments requires 3mm external bleed on all sides.
Borders
We recommend that all borders (including partial borders/strips) are at least 5mm in width and/or placed 5mm inside the trim edge on all sides.
Spot UV (Click to Expand)
Spot UV (also known as Spot Gloss) is a clear gloss coating which is applied to a selected area of your design. Spot UV is often used as a design technique to draw attention to a particular element such as a logo or as a creative background to give the appearance of texture.
Because spot UV is a flat (2D) finish, the effect is able to bleed off the edge of your design.
There can be a small amount of variance/shift when applying the Spot UV effect. Because of this we advise against applying the effect to very thin lines, small text, finely detailed artwork and borders or narrow strips around the outside of your design.
Instructions for setting up Spot UV Artwork:
The Spot UV effect can only be created/setup in Adobe InDesign or Adobe Illustrator. If you don’t have either of these programs please select the Check and Make Press Ready service when placing your order and we will setup the Spot UV artwork for you (please provide us with a with a vector file).
-
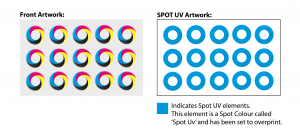
- Create a new layer for the Spot UV effect. Select the elements you wish to enhance with the effect and duplicate them to the new layer.
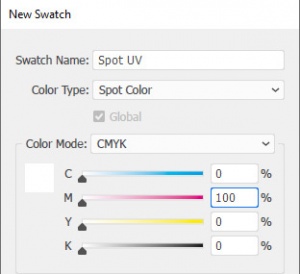
- Create a NEW colour swatch and name it ‘Spot UV’. Select colour type ‘Spot Colour’ and colour mode as CMYK. Ensure that the colour breakdown of the swatch is 100% of either C, M, Y or K. We recommend C:0%, M:100%, Y:0%, K:0%. Apply the new colour swatch to all elements on your new layer which you wish to have Spot UV applied to. No other elements should be on your Spot UV artwork layer.
-
- IMPORTANT – Select all graphics on the new Spot UV layer and set them to “Overprint Fill/Stroke” in the Attributes palette:
- Adobe InDesign: Window > Output > Attributes
- Adobe Illustrator: Window > Attributes
- It is important to make sure that the Spot UV layer is identical in all respects (size, orientation, crop, position of images and text etc.) to your original artwork.
- How to Supply your Files
Your Spot UV layer must be supplied as a separate file from your front and back artwork. E.g. for a double sided business card you would supply 3 files:- The FRONT of the Business Card
- The BACK of the Business Card
- The Spot UV Artwork Layer
- IMPORTANT – Select all graphics on the new Spot UV layer and set them to “Overprint Fill/Stroke” in the Attributes palette:
Please note: If the effect is only applied to one side of your design, it will always be applied to the front page of your artwork.
Please click here to navigate to our Guideline Templates page to download our PDF instructions on how to setup the Spot UV artwork.
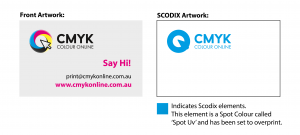
Scodix (Click to Expand)
Scodix is a similar clear finish to Spot UV although Scodix is a higher gloss raised 3D effect.
As Scodix is a raised finish it is not possible to bleed the effect off the edge of your design. All Scodix elements must be placed at least 5mm inside the trim edge.
There can be a small amount of variance/shift when applying the Scodix effect. Because of this we advise against applying the effect to very thin lines, small text, finely detailed artwork and borders or narrow strips around the outside of your design.
Artwork requirements:
-
- Text must be no less than 8pt
- The line weight must be no less than 0.6pt
- Text should be in a sans serif font (e.g Helvetica) as opposed to a serif font (e.g. Times New Roman)
- Scodix elements cannot bleed off the edge of your design or overlap a score or fold line
- All Scodix elements must be placed at least 5mm inside the trim edge and 5mm away from all score and fold lines
- We don’t recommend applying Scodix to thin or fine elements or fonts.
Instructions for setting up Scodix Artwork:
The Scodix effect can only be created/setup in Adobe InDesign or Adobe Illustrator. If you don’t have either of these programs please select the Check and Make Press Ready artwork service and we will setup the Scodix effect for you (please provide us with a with a vector file).
-
- Create a new layer for the Scodix (raised gloss) effect. Select the elements you wish to enhance with the effect and duplicate them to the new layer.
- Create a NEW colour swatch and name it ‘Scodix’. Select colour type ‘Spot Colour’ and colour mode as CMYK. Ensure that the colour breakdown of the swatch is 100% of either C, M, Y or K. We recommend C:0%, M:100%, Y:0%, K0%. Apply the new colour swatch to all elements on your new layer which you wish to have Scodix applied to. No other elements should be on on your Scodix artwork layer
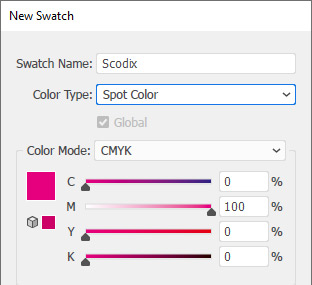
-
- IMPORTANT – Select all graphics on the new layer and set them to “Overprint Fill/Stroke” in the Attributes palette:
- Adobe InDesign: Window > Output > Attributes
- Adobe Illustrator: Window > Attributes
- It is important to make sure that the Scodix layer is identical in all respects (size, orientation, crop, position of images and text etc.) to your original artwork.
- How to Supply your Files
Your Scodix layer must be supplied as a separate file from your front and back artwork. E.g. for a double sided business card you would supply 3 files:- The FRONT of the Business Card
- The BACK of the Business Card
- The SCODIX Artwork Layer
- IMPORTANT – Select all graphics on the new layer and set them to “Overprint Fill/Stroke” in the Attributes palette:
Please note: The front page of your artwork will be the page that the Scodix is applied to.
Please click here to navigate to our Guideline Templates page to download our PDF instructions on how to setup the Scodix artwork.
Raised Metal (Click to Expand)
Raised Metal is a similar process to Scodix, however rather than producing a clear gloss effect, a gold or silver foil is applied. This produces a gold or silver raised (3D) spot finish. This effect is a fantastic way to highlight elements in a design.
As raised metal is a raised finish it is not possible to bleed the effect off the edge of your design. All raised metal elements must be placed at least 5mm inside the trim edge.
There can be a small amount of variance/shift when applying the raised metal effect. Because of this we advise against applying the effect to very thin lines, small text, finely detailed artwork and borders or narrow strips around the outside of your design.
Artwork requirements:
-
- Text must be no less than 8pt
- The line weight must be no less than 0.6pt
- Text should be in a sans serif font (e.g Helvetica) as opposed to a serif font (e.g. Times New Roman)
- Raised metal elements cannot bleed off the edge of your design or overlap a score or fold line
- All Raised metal elements must be placed at least 5mm inside the trim edge and 5mm away from all score and fold lines
- We don’t recommend applying Scodix to thin or fine elements or fonts.
Instructions for setting up Raised Metal Artwork:
The Raised metal effect can only be created/setup in Adobe InDesign or Adobe Illustrator. If you don’t have either of these programs please select the Check and Make Press Ready artwork service and we will setup the Raised Metal artwork for you (please provide us with a with a vector file).
-
- Create a new layer for the Raised Metal effect. Select the elements you wish to enhance with the effect and duplicate them to the new layer. As the Raised Metal finish is solid and printed on top, the same CMYK element should not be in the CMYK artwork layer as it may be visible due to possible shifting. To avoid this, please ensure you remove duplicated CMYK elements from your artwork layer and only have then visible on the Spot layer.
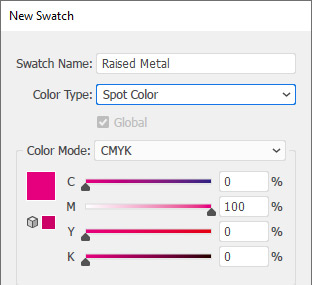
- Create a NEW colour swatch and name it ‘Raised Metal’. Select colour type ‘Spot Colour’ and colour mode as CMYK. Ensure that the colour breakdown of the swatch is 100% of either C, M, Y or K. We recommend C:0%, M:100%, Y:0%, K0%. Apply the new colour swatch to all elements on your new layer which you wish to have Raised Metal applied to. No other elements should be on on your Raised Metal artwork layer.
-
- IMPORTANT – Select all graphics on the new layer and set them to “Overprint Fill/Stroke” in the Attributes palette:
- Adobe InDesign: Window > Output > Attributes
- Adobe Illustrator: Window > Attributes
- It is important to make sure that the Raised Metal layer is identical in all respects (size, orientation, crop, position of images and text etc.) to your original artwork. Please check you have followed Step 1 at this stage.
- How to Supply your Files
Your Raised Metal layer must be supplied as a separate file from your front and back artwork. E.g. for a double sided business card you would supply 3 files:- The FRONT of the Business Card
- The BACK of the Business Card
- The Raised Metal Artwork Layer.
- IMPORTANT – Select all graphics on the new layer and set them to “Overprint Fill/Stroke” in the Attributes palette:
Please note: The front page of your artwork will be the page that the Raised Metal is applied to.
Please click here to navigate to our Guideline Templates page to download our PDF instructions on how to setup the Raised Metal artwork.

Stickers Information

Versatile and available in a variety of stocks, our stickers are offered in a large array of different sizes and formats.
Guideline templates can be found by clicking here and selecting the style & option you require. Before using our templates, please make sure you read the “read me” file first.
Please click on the button below for detailed information on Stickers:
Setting up artwork for Wire Bound Books

Wire Binding is a form of binding in which all pages are punched and bound using wire coils.
For guideline templates please click here. Before using our templates, please ensure you always read the “read me” file first.
To help with setting up your artwork, please use the button below to navigate through to our wire binding artwork resources.
Setting up artwork for Wire Bound Calendars

Wire Bound Calendars have different artwork requirements to our other Calendars.
For guideline templates please click here. Before using our templates, please ensure you always read the “read me” file first.
To help with setting up your artwork, please use the button below to navigate through to our Wire Bound Calendar artwork resources.
Setting up artwork for X-Banners
X-Banners have specific size and bleed requirements.
The finished visible size of X-Banners is 600 x 1600mm.
Artwork must be supplied at 600 x 1600mm PLUS 10mm of external bleed on all edges.
This equates to artwork that needs to be supplied at 620 x 1620mm.
X-Banners also have an internal bleed requirement of 50mm. This means that no logo, text or important element which you wish to be visible should be placed closer than 50mm to the trim edge.
Please click on the button below for our diagrams and detailed artwork instructions: