How to Place a New Order
Need help placing your order through our website? Please follow the simple steps shown below.
Step 1: Selecting the Product Category
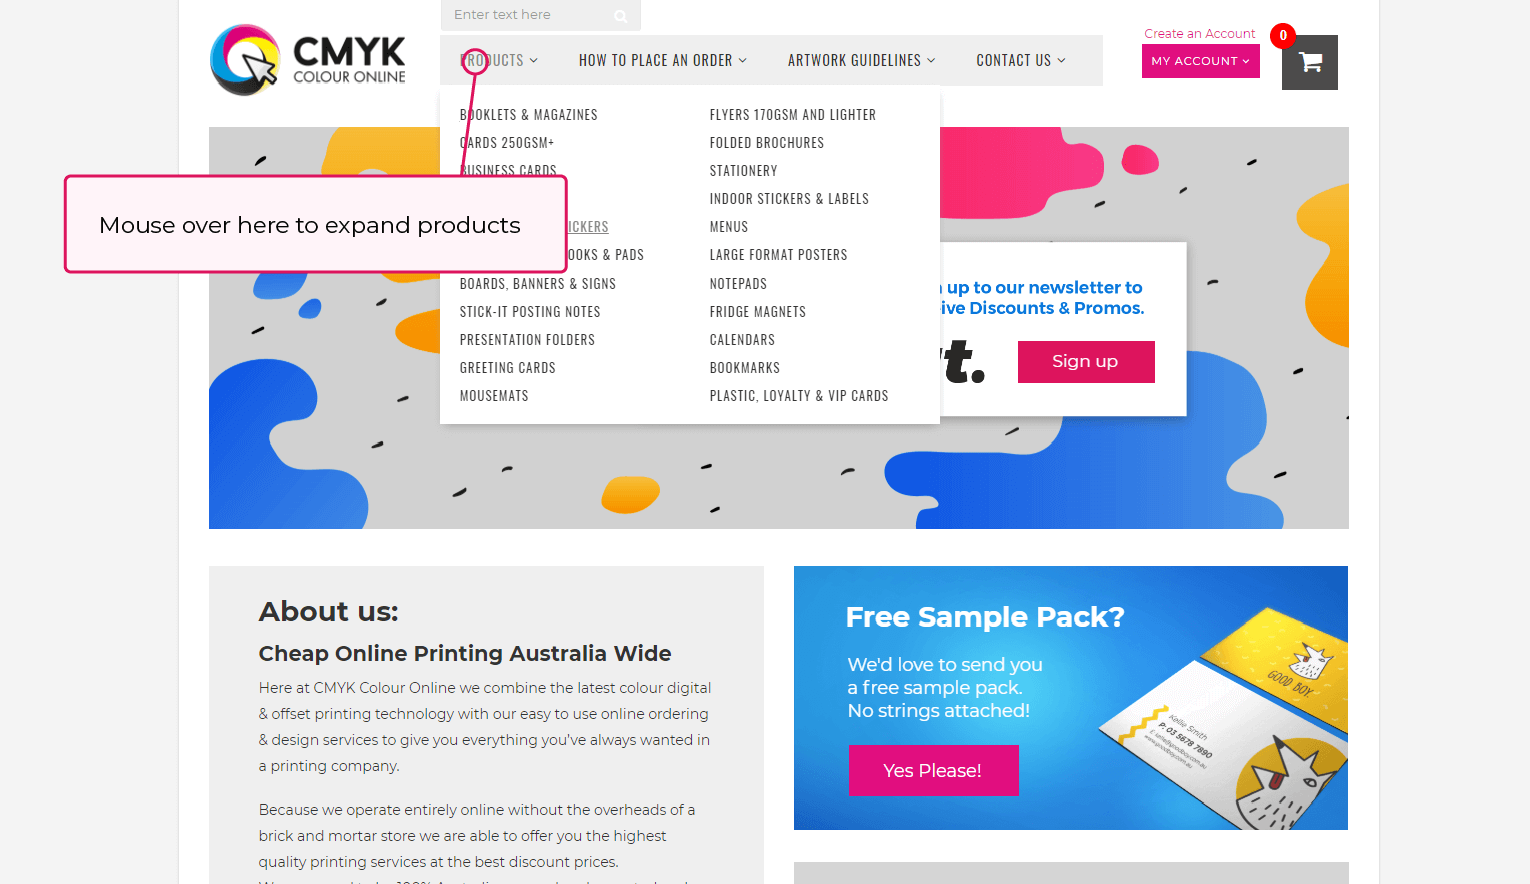
Select the product category you require from the products drop down menu at the top of the page:
Step 2: Selecting the Product
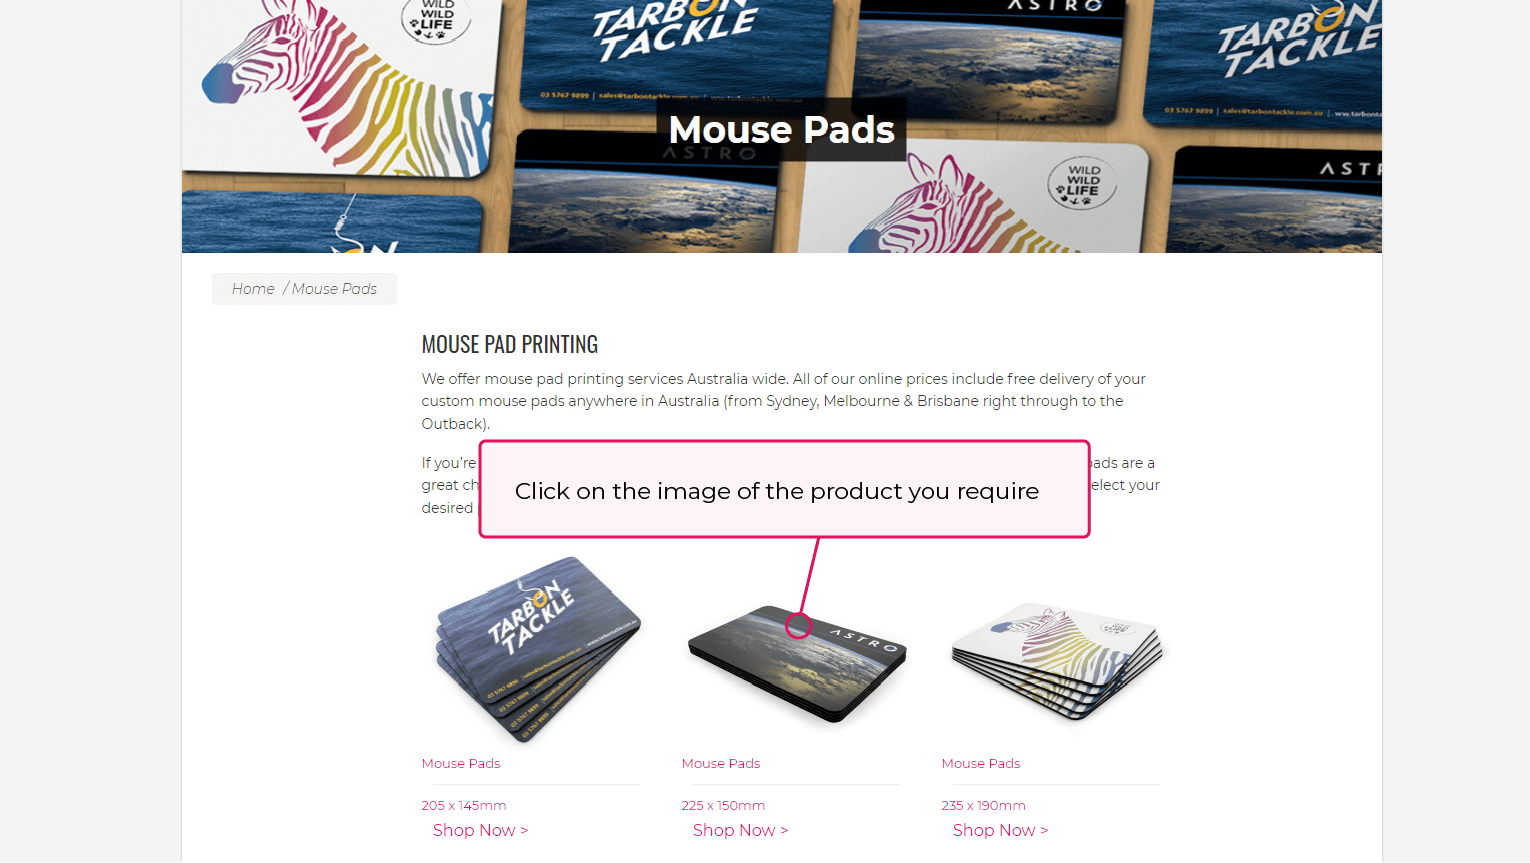
This will take you to the product category page for your chosen product category. Navigate to the product that you wish to order by clicking on the image of the product that you require. If you need more information on the available products before proceeding, please scroll down to read a brief summary of the available products:
Step 3: Confirming the specifications of your Product
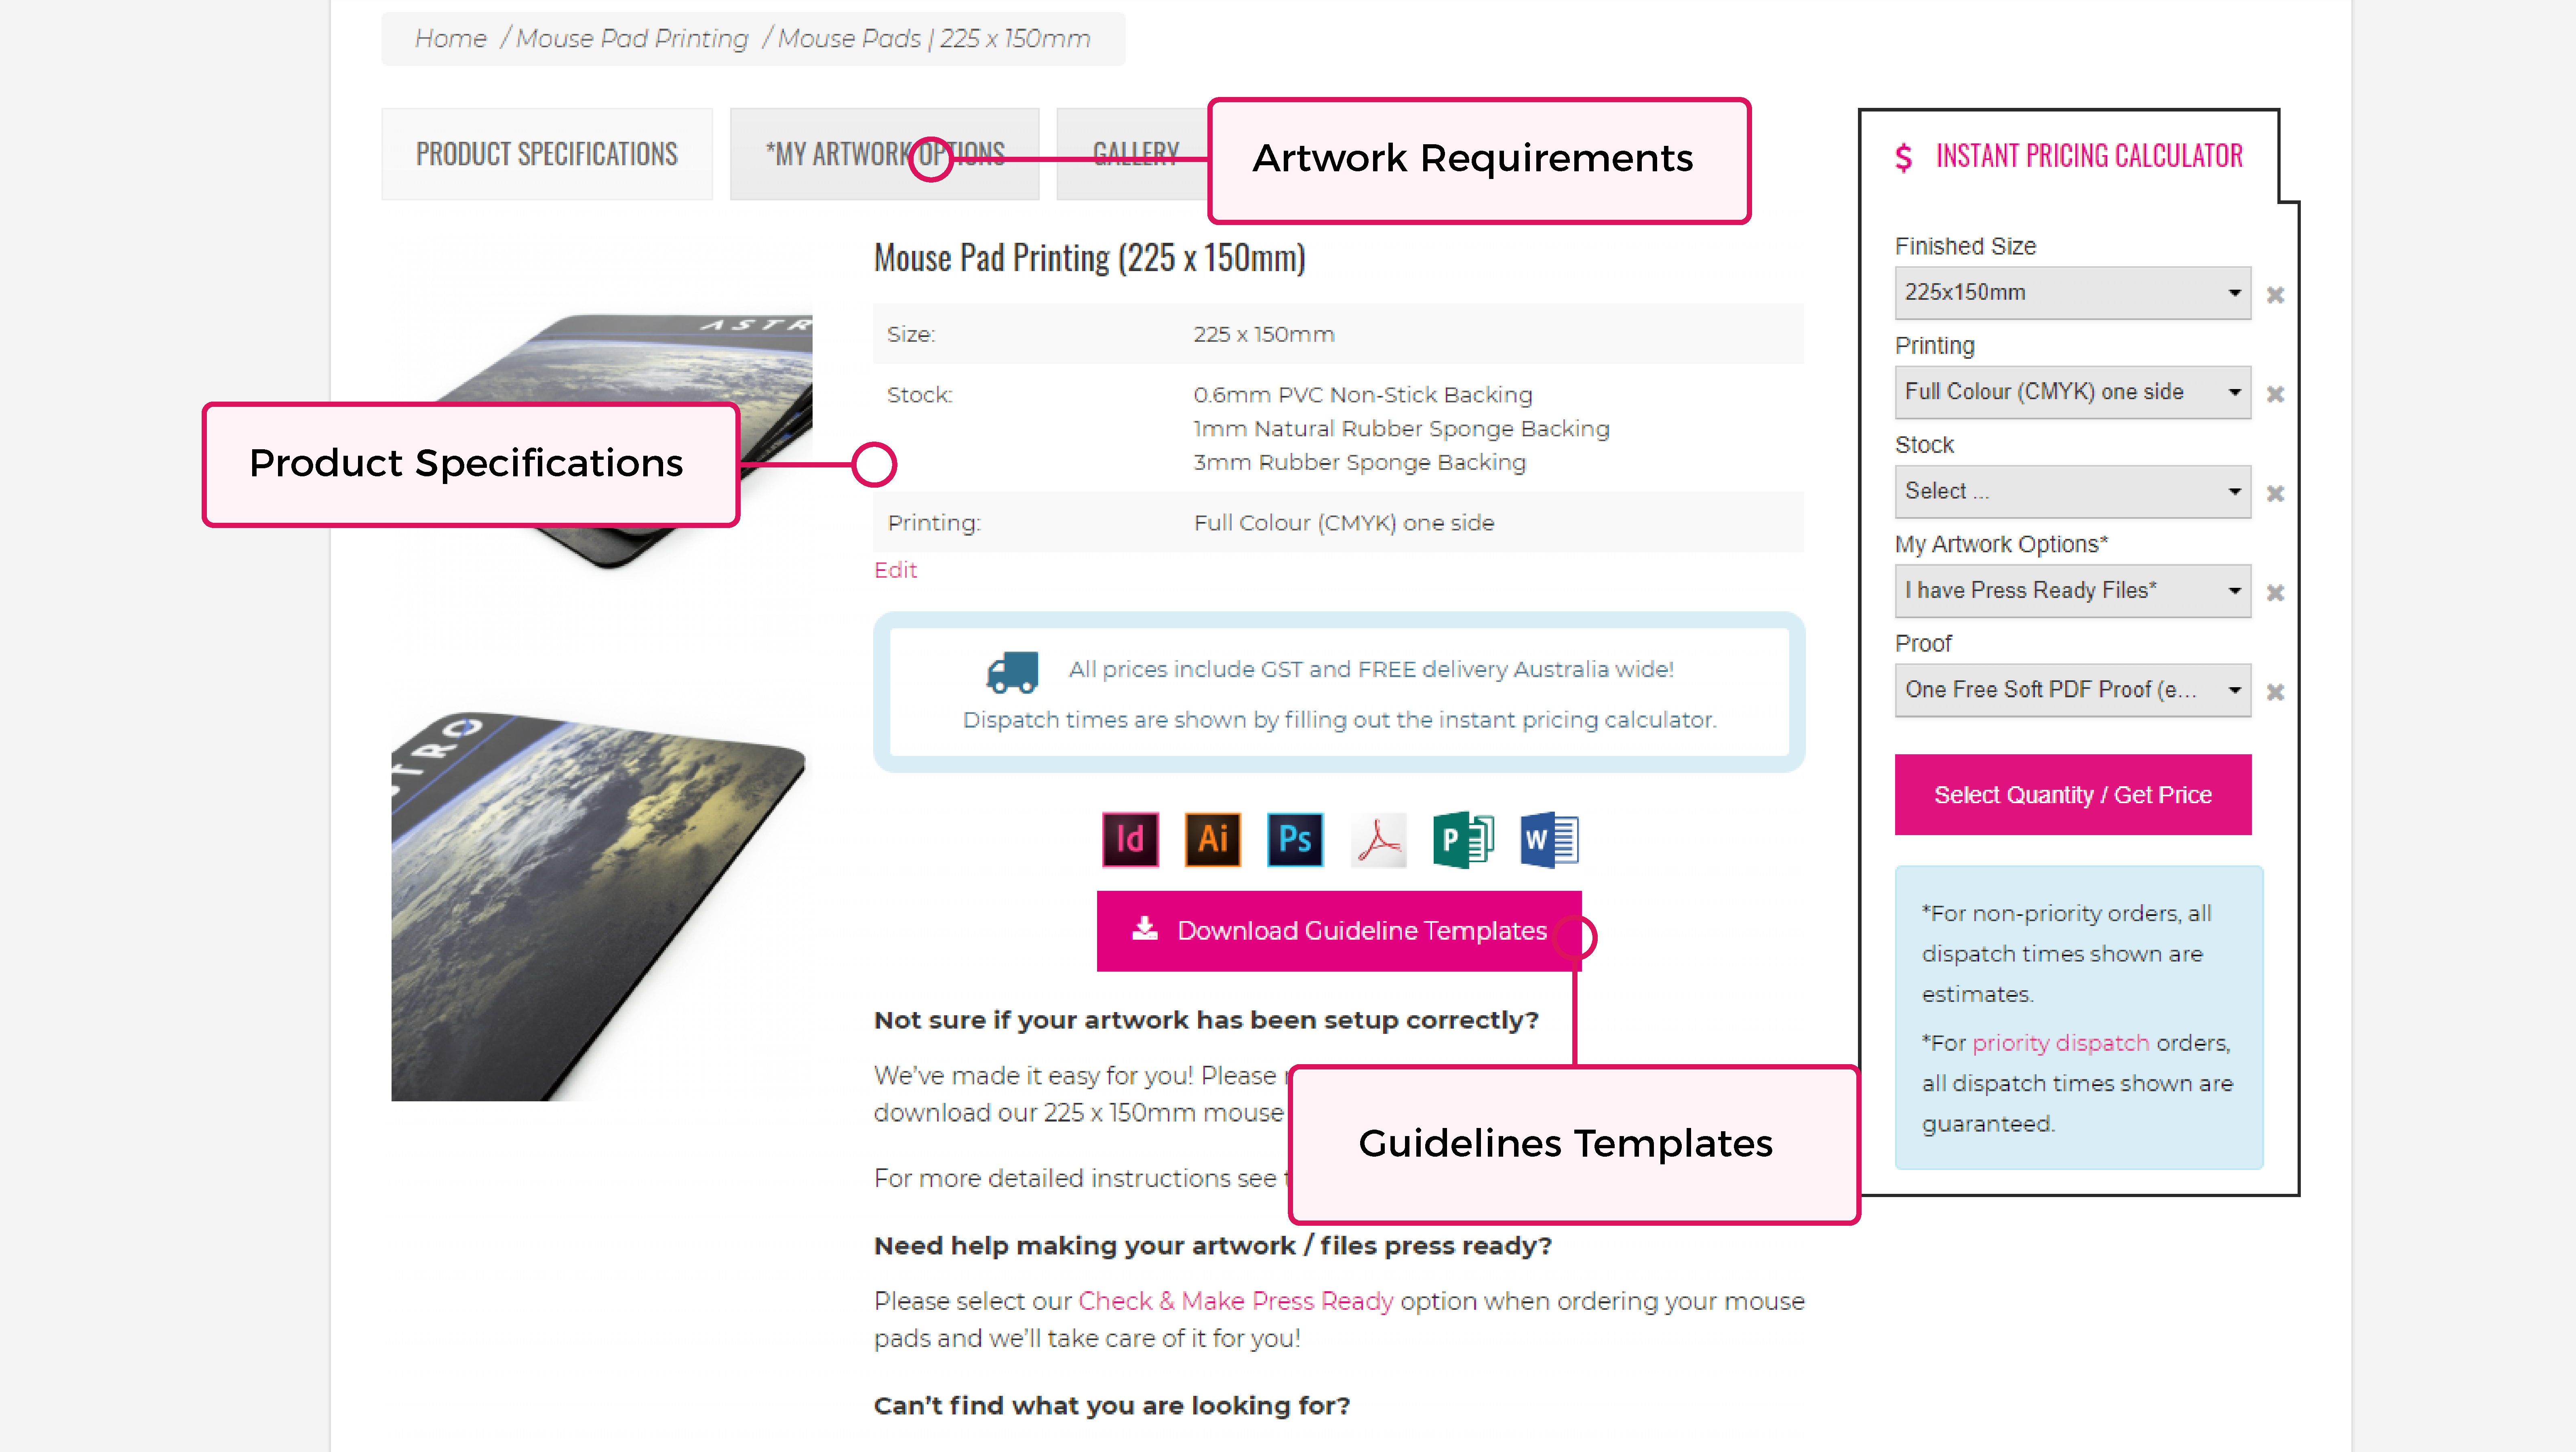
Read through both the product specifications and artwork requirements for your product.
Step 4: The Instant Pricing Calculator
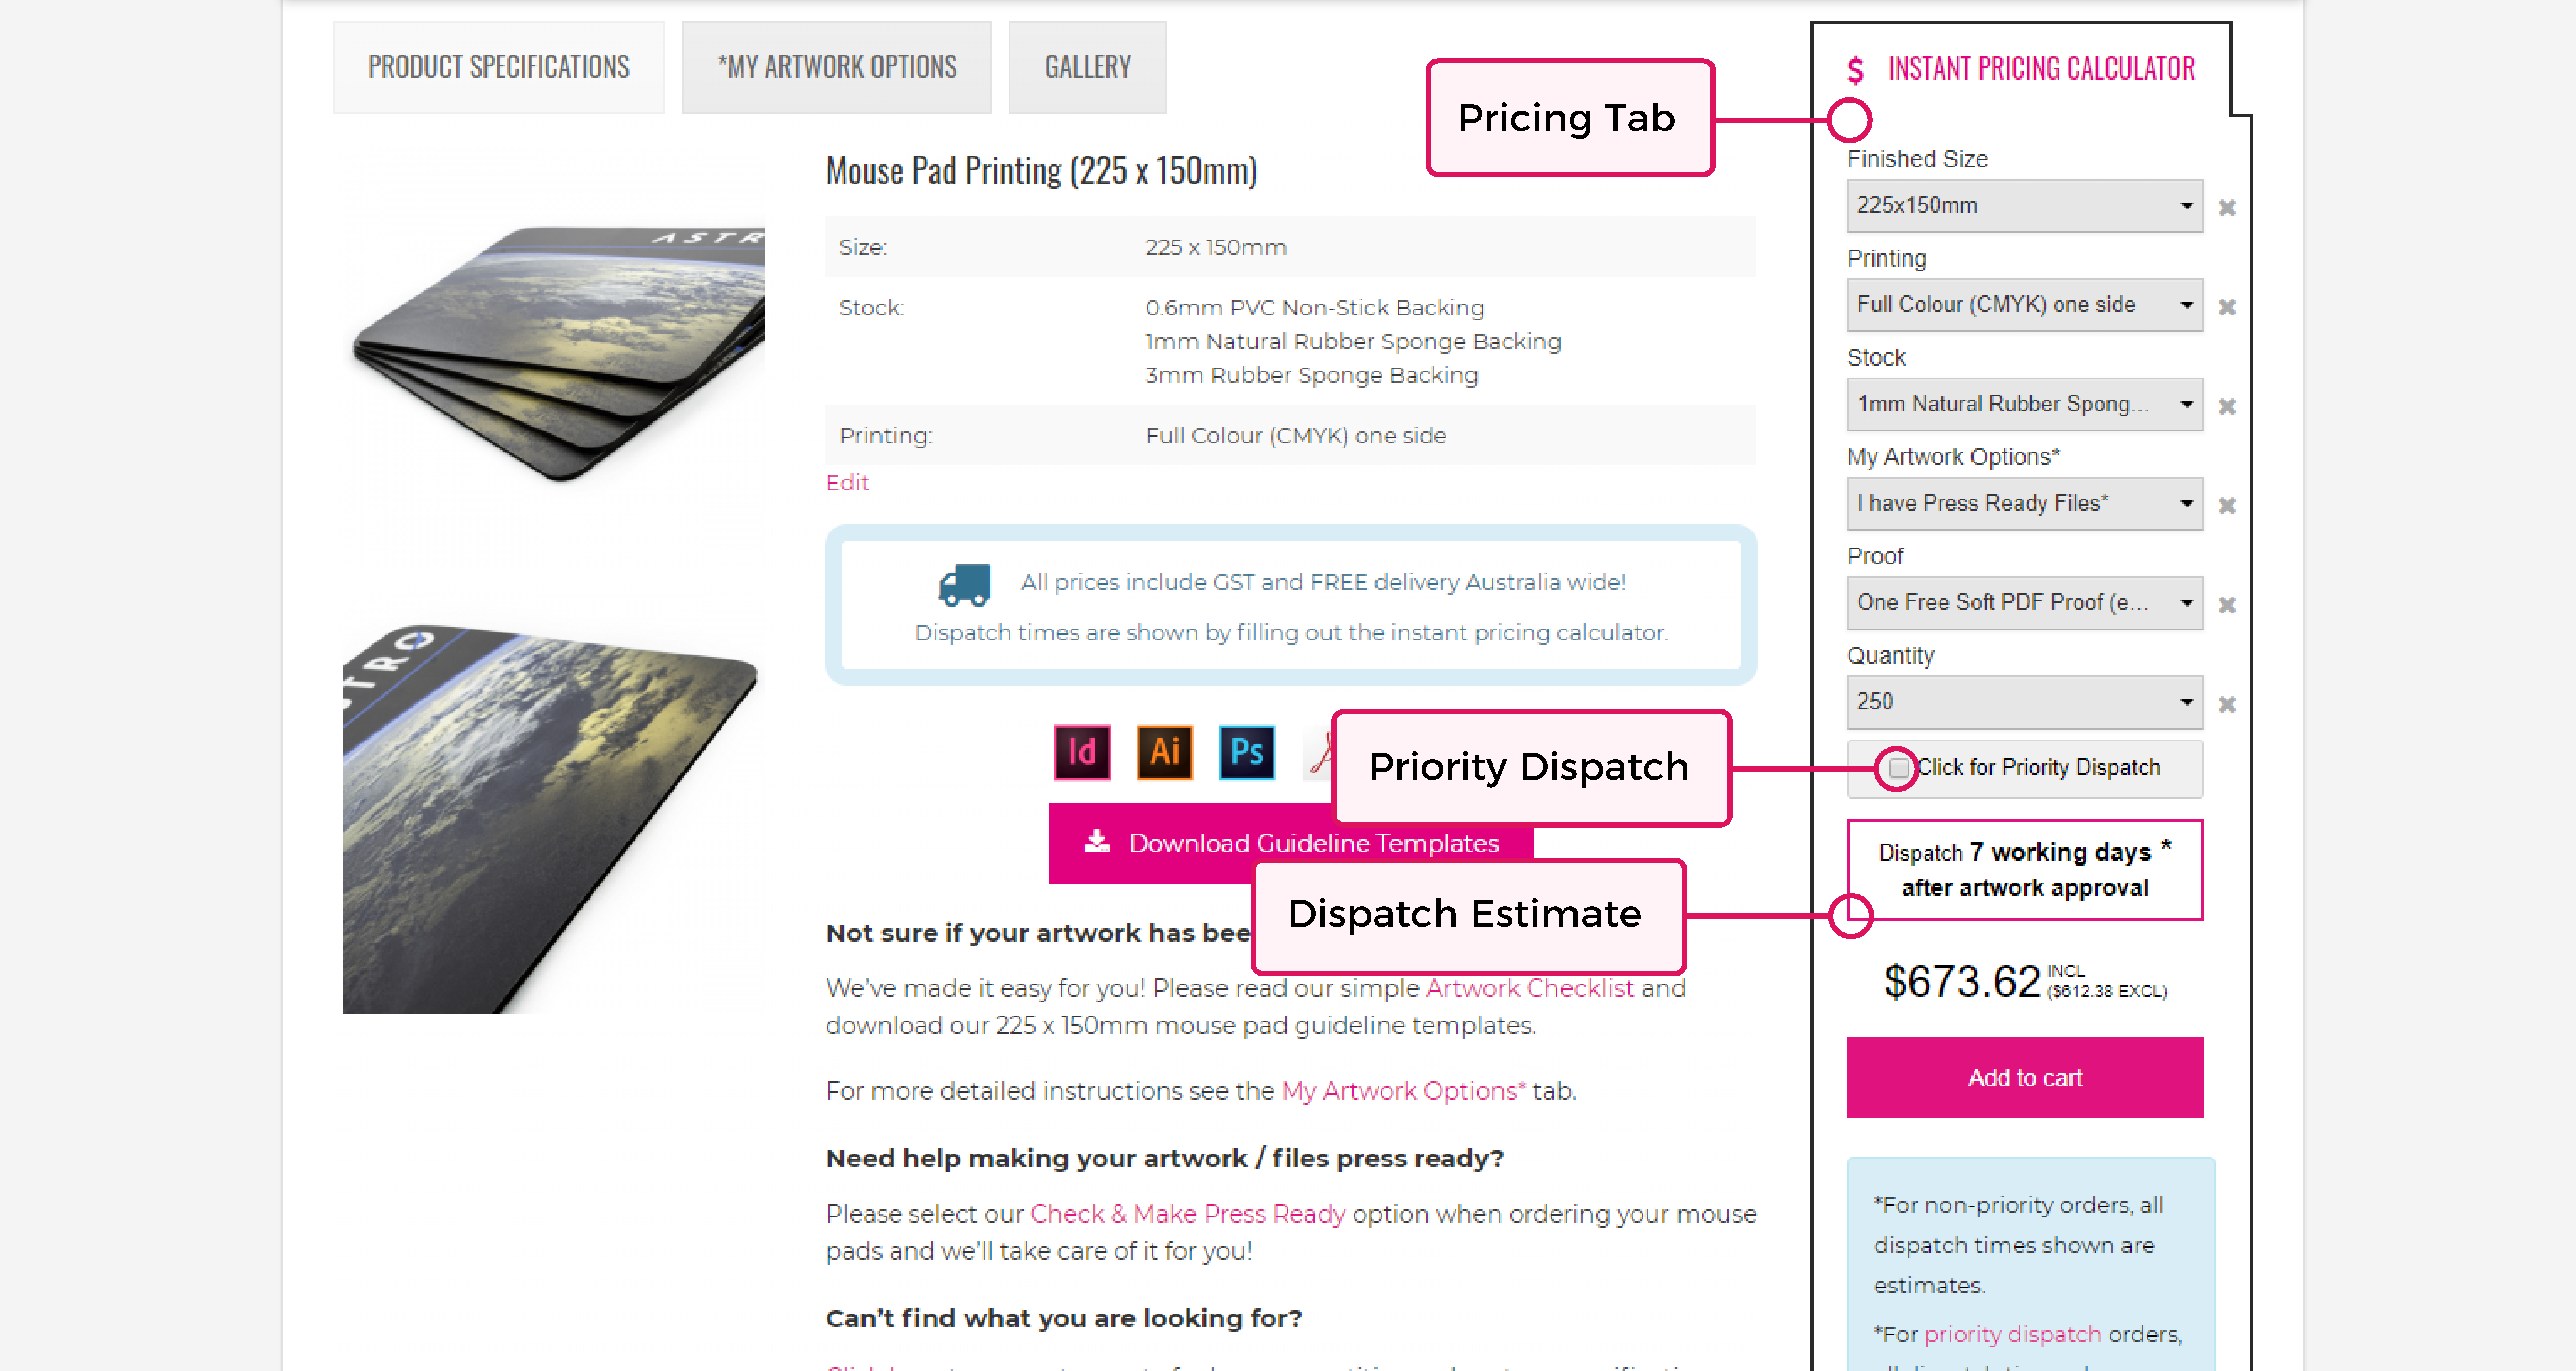
Select all of your specifications in the Pricing Calculator. Click the ‘Get Price’ button. The pricing tab will expand to show the estimated dispatch date & price.
You may wish to include ‘Priority Dispatch’ at this point. If the service is available for your selected product/ quantity simply select the Priority Dispatch box directly under the quantity selection. Please note, the service is not available for all products and quantities.
Step 5: The Shopping Cart
- If you are happy with the price and dispatch date, click ‘add to cart’. This will add this product to your shopping cart which can be found by clicking the grey shopping cart icon in the top right of the page. Repeat the steps above for each additional item you wish to order.
- Click the ‘Checkout’ button on the bottom of your screen to proceed with placing an order for the item/s in your shopping cart.
This will take you to the order details page.

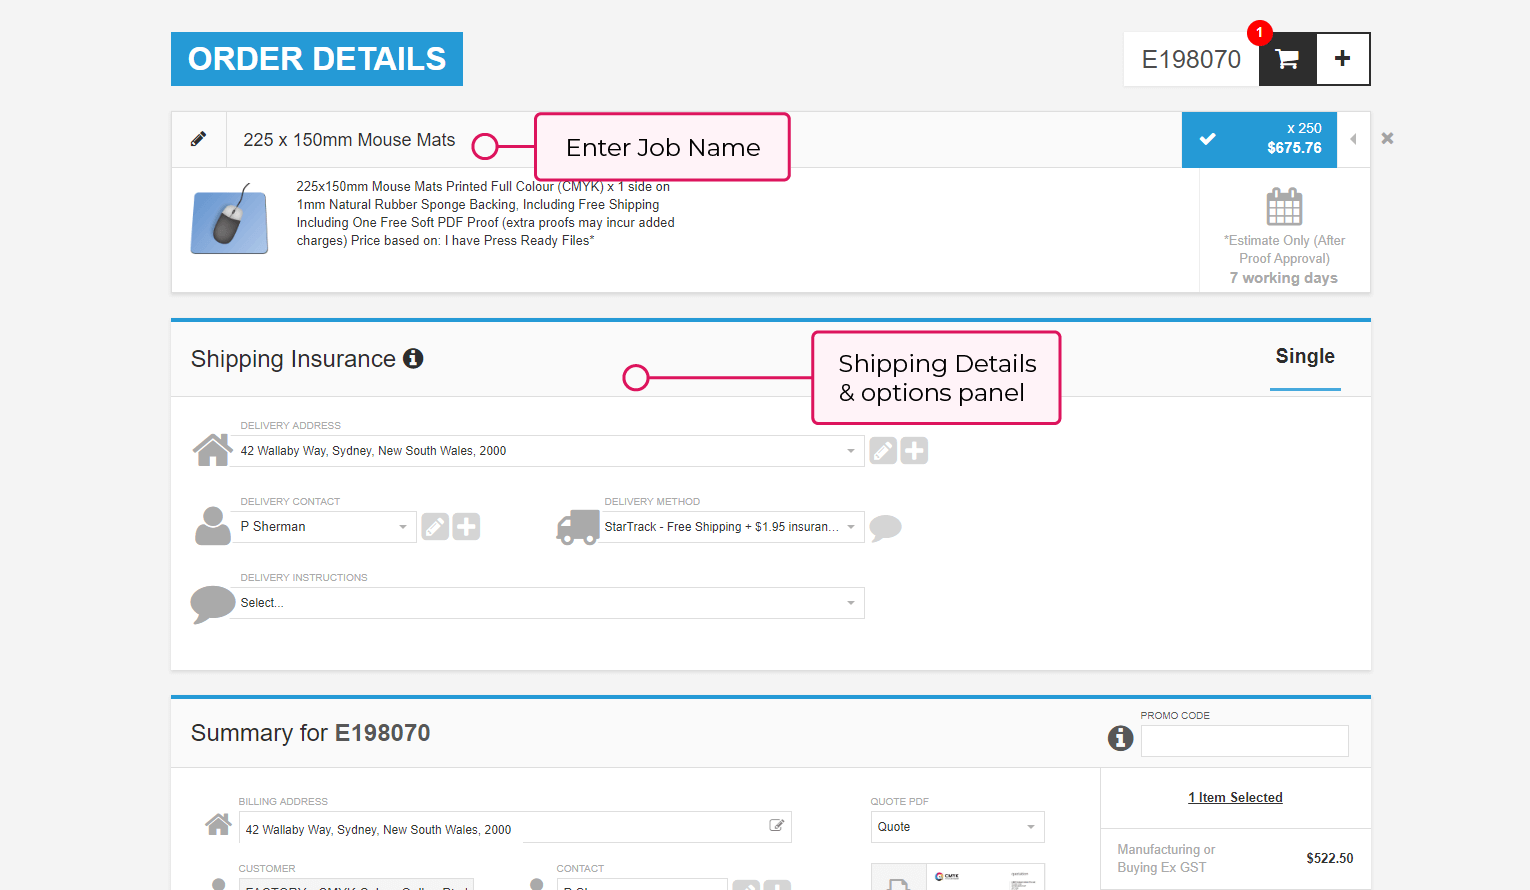
Step 6: Order Details
- Select the pencil to change the Job Name.
- Fill out the Shipping/ Delivery details (middle panel) and Billing Details (bottom panel)
- At the bottom of the page, tap through the link to read the terms and conditions. You must agree with the terms and conditions to proceed with placing an order.
To agree with the terms and conditions please select the check box then tap the ‘Complete Order’ button. This will take you to the payment section.
Step 7: Payment
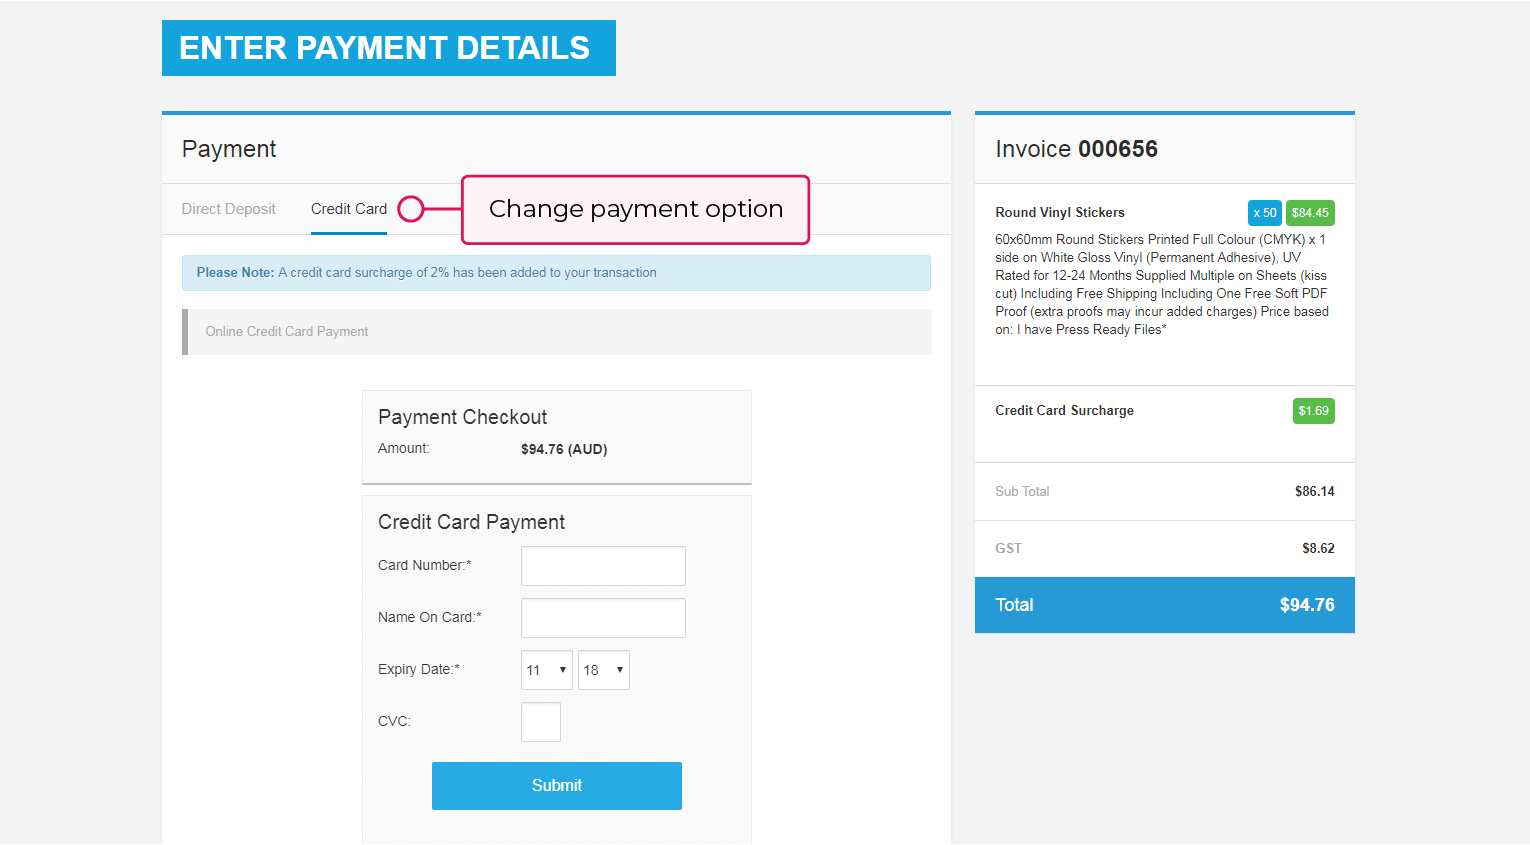
Here you will be able to pay for your order with either Credit Card or Direct Deposit. Please note that we cannot proceed with your order without first receiving payment.
To change payment methods, please click the other option under ‘Payment’ along the top of the page. The blue underline indicates the selected payment method.
Credit Card:
Enter your Credit Card details & click the ‘Submit’ button.
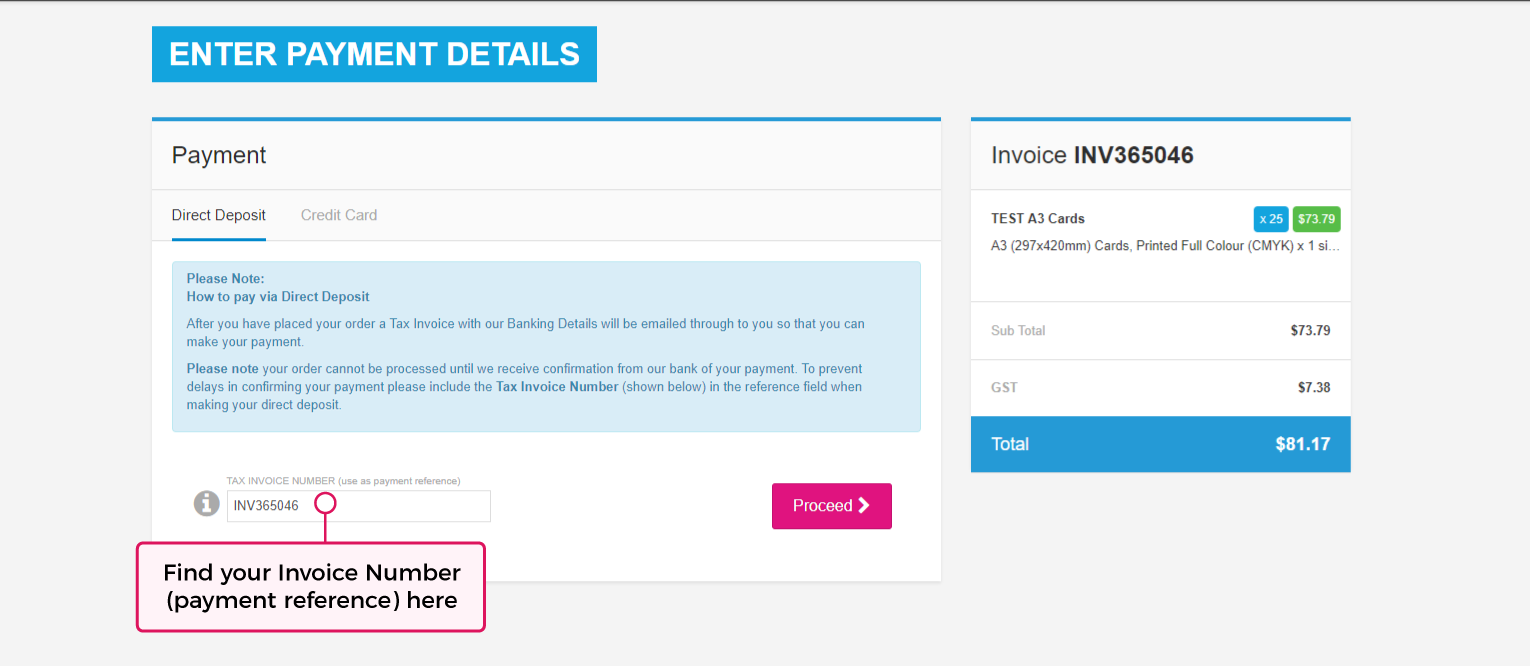
Direct Deposit:
Please carefully read the payment instructions, make a record of the ‘Invoice Number’ (this is your payment reference) and click the ‘Proceed’ button. Banking details will then be emailed to you along with your Tax Invoice.
Please note that Direct Deposit payments can take 1-2 working days for your bank to process. Direct Deposit orders cannot proceed until your funds are confirmed as received by our bank.
Step 8: Uploading your artwork
Although PDF’s are our preferred file type, we also accept the following file types:
- Illustrator files (.ai)
- Photoshop files (.psd)
- InDesign files with all links and fonts embedded (.indd or .idml)
- EPS files
- Word Documents (.doc, .docx)[Please note that Microsoft Word does not allow you to save high resolution images. We do not recommend using Word if there are images in your artwork]
- Publisher files (.pub)
- Image file formats (.bmp, .tiff, .jpeg, .png, etc…)
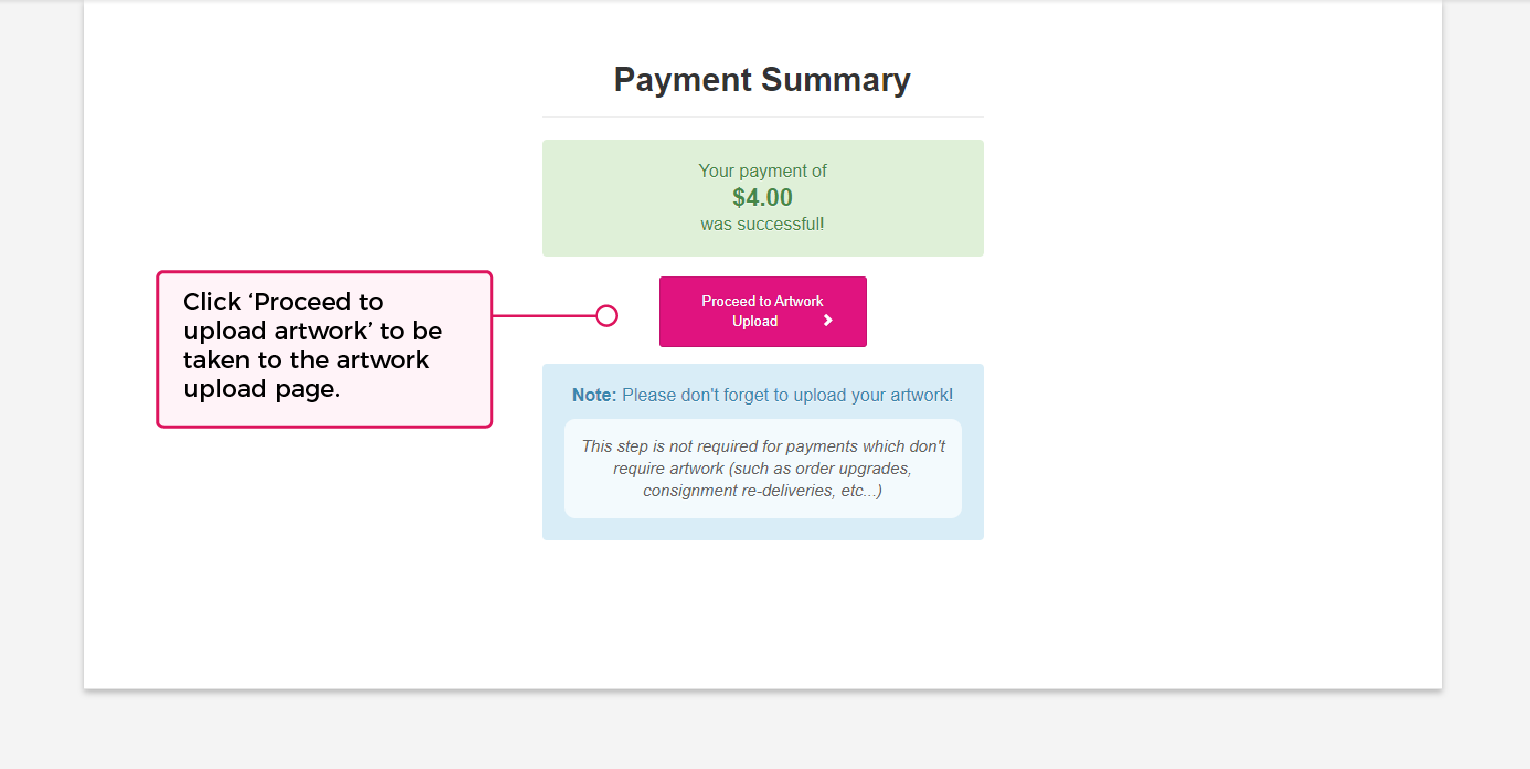
Click on the ‘Proceed to upload your artwork’ to be taken to the artwork upload page.
On the artwork upload page you can upload artwork for each item on your order.
- Upload PDFs in the left Artwork Uploader
- Upload other file types in the right Artwork Uploader.
Files can be uploaded by clicking on the ‘Click HERE to Upload’ buttons or the ‘No file selected’ text.
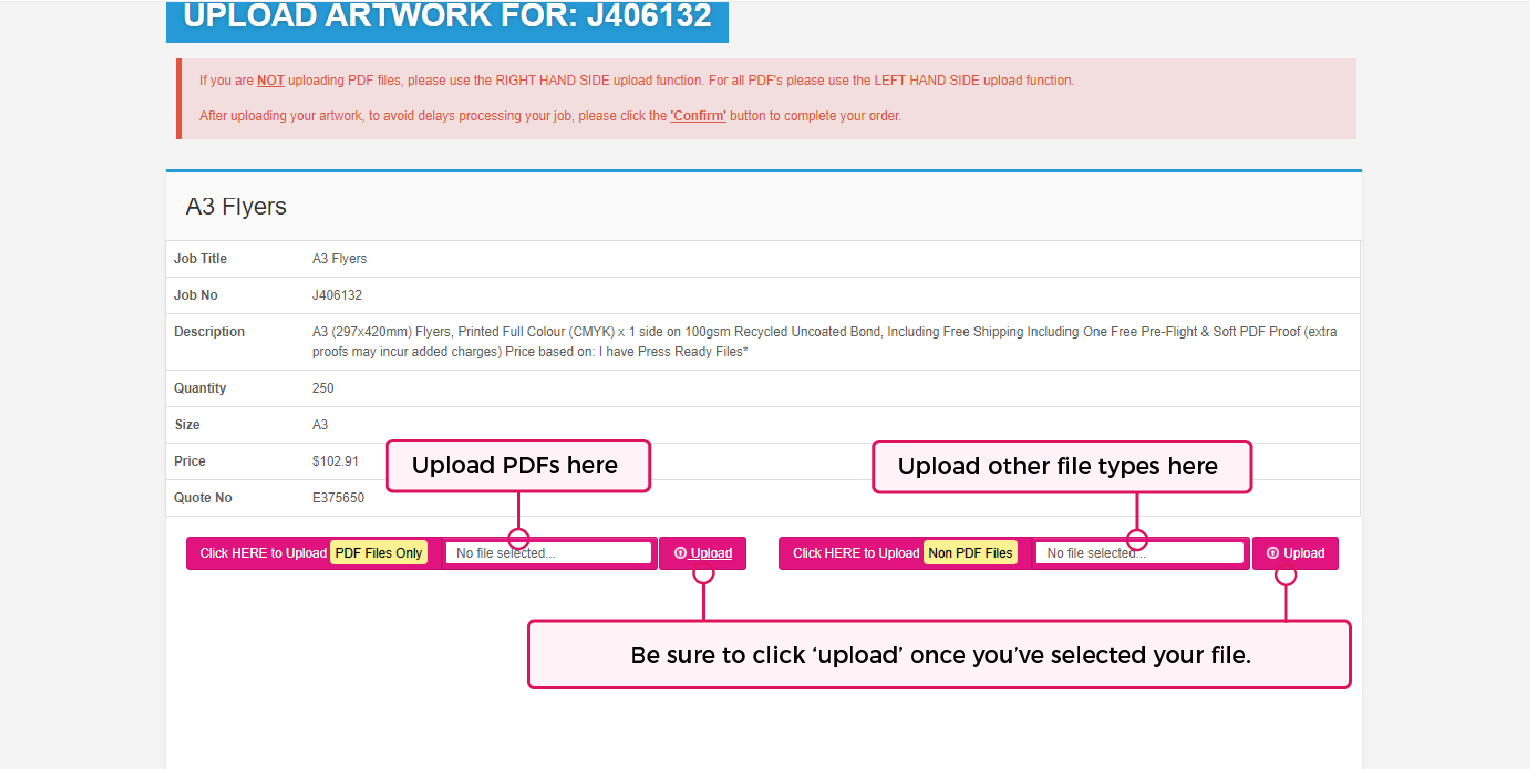
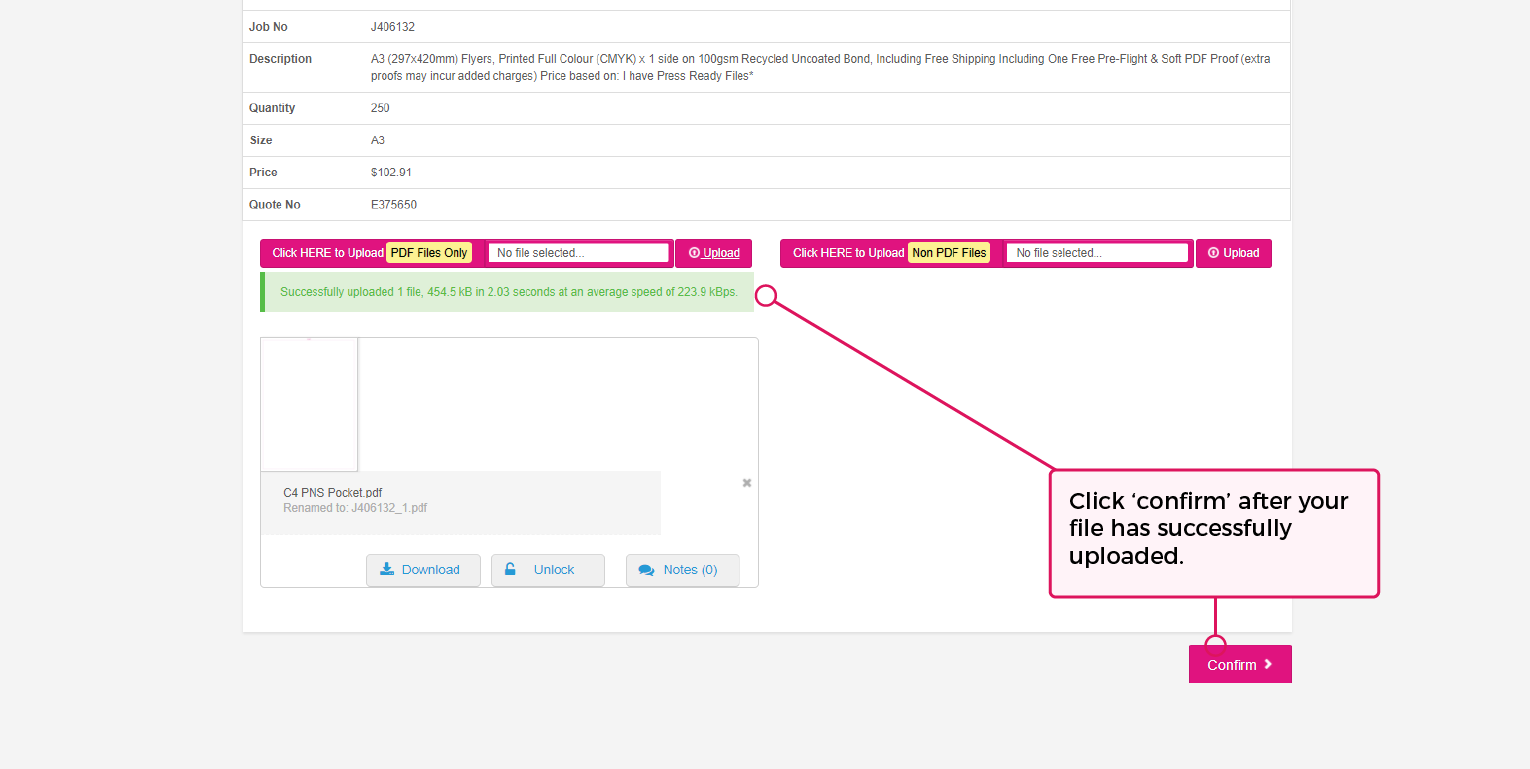
Once you’ve uploaded your file/s and the file/s shows it was successfully uploaded, click the ‘Confirm‘ button in the bottom right corner of the page.
Please note, if you have selected the ‘I am supply Press Ready files’ option for any item, your artwork needs to meet our Artwork Requirements.
Your order should now be successfully placed.
Once we receive confirmation of your payment, a soft copy PDF proof will be emailed to you for artwork approval.
Please note, your order will not proceed into production until your proof approval is received.
Please click here for instructions on how to approve your proof.
If you are having difficulties placing your order please contact us and a member of our team will reply promptly via email.
Step 1: Selecting the Product Category
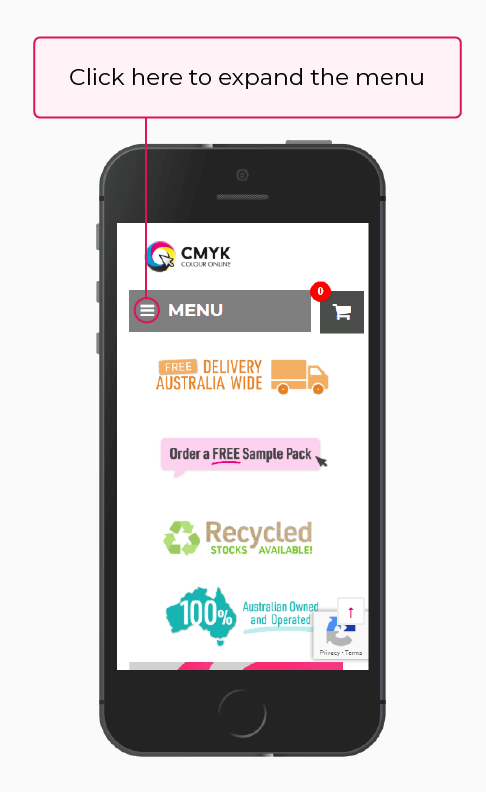
Navigate to the product category you require from the menu in the top left of your screen:
Step 2: Selecting the Product
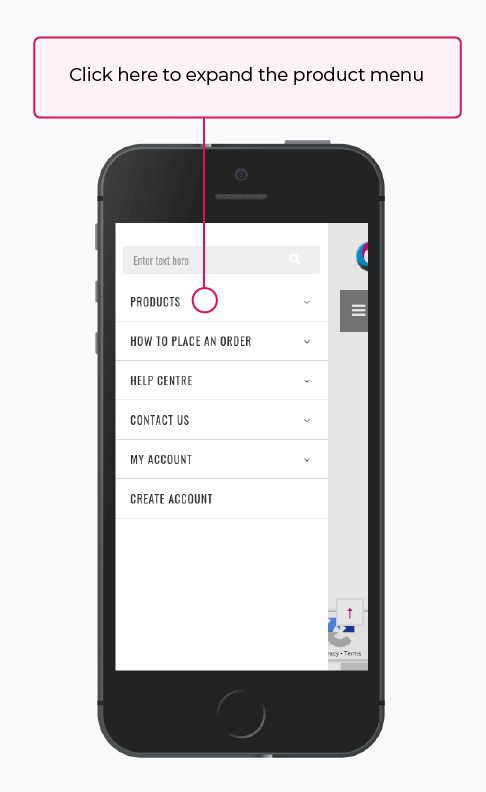
- Tap on ‘products’ and the product menu will expand. You can now select your product category.
- This will take you to the category page for your chosen product.
Navigate to the product that you wish to order by clicking on the image of the product that you require.
If you need more information on the available products before proceeding, please scroll down to read a brief summary of the available products:
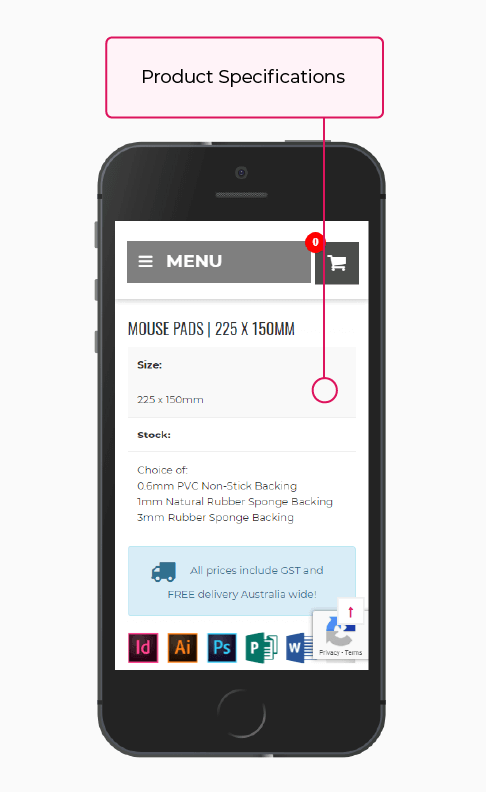
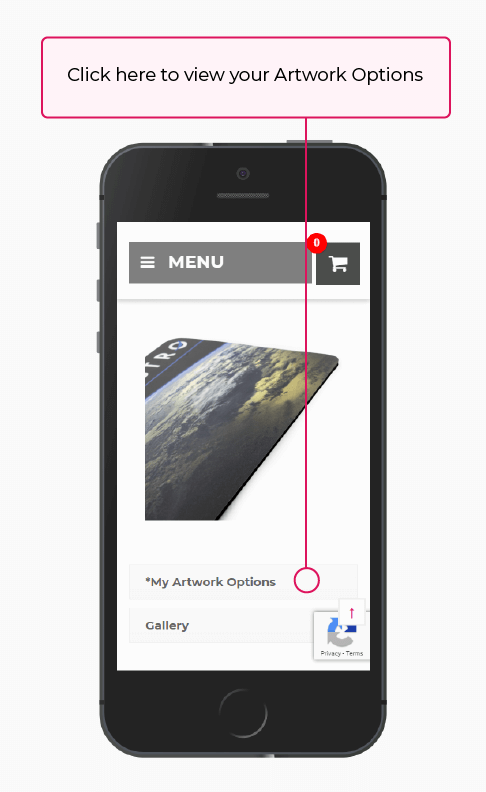
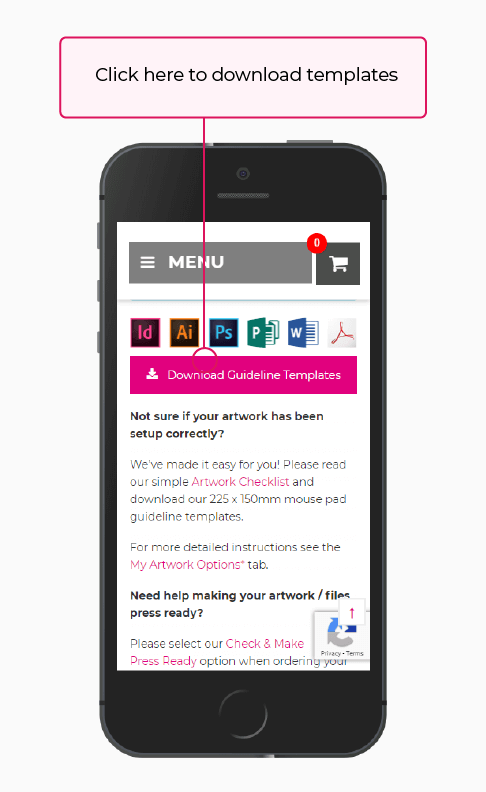
Step 3: Confirming the specifications of your Product
Read through both the product specifications and artwork requirements for your product.
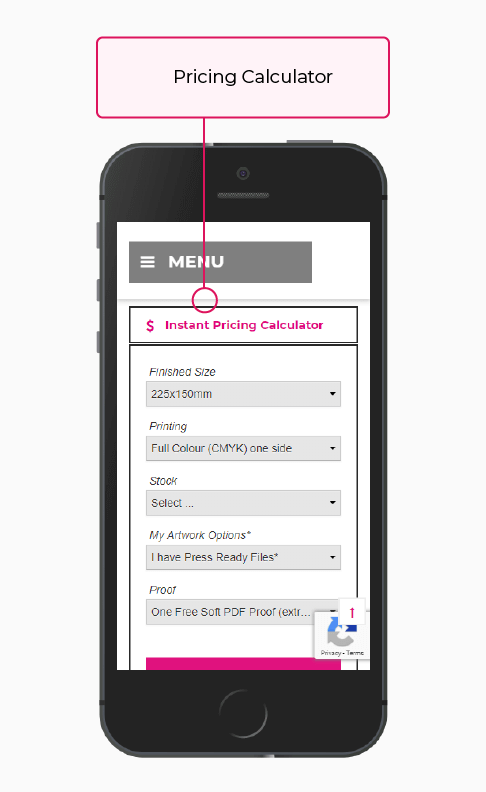
Step 4: The Instant Pricing Calculator
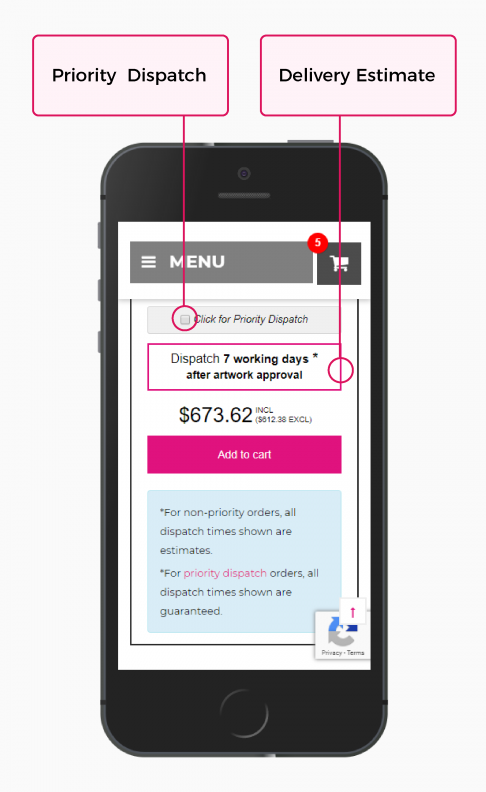
Select all of your specifications in the Pricing Calculator. Tap the ‘Get Price’ button. The pricing tab will expand to show the estimated dispatch date & price.
You may wish to include ‘Priority Dispatch’ at this point. If the service is available for your selected product/ quantity simply select the Priority Dispatch box directly under the quantity selection. Please note, the service is not available for all products and quantities.
Step 4: The Shopping Cart
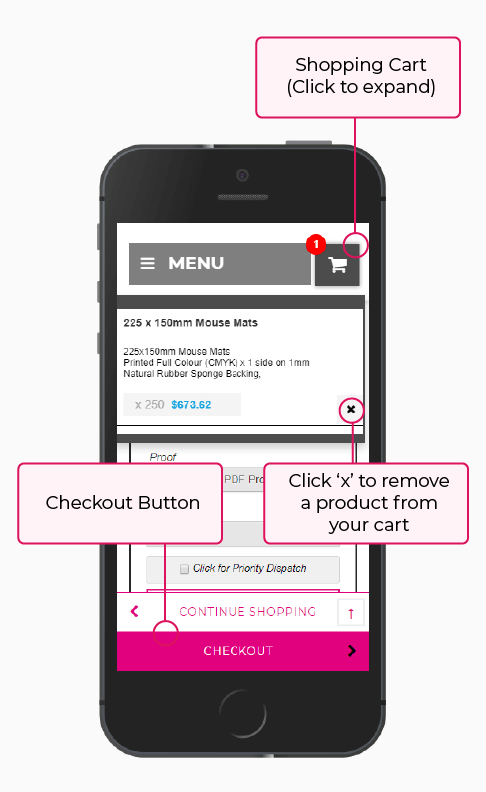
- If you are happy with the price and dispatch date, tap ‘add to cart’. This will add this product to your shopping cart which can be found by tapping the grey shopping cart icon in the top right of the page. Repeat the steps above for each additional item you wish to order.
- Tap the ‘Checkout’ button on the bottom of your screen to proceed with placing an order for the item/s in your shopping cart.
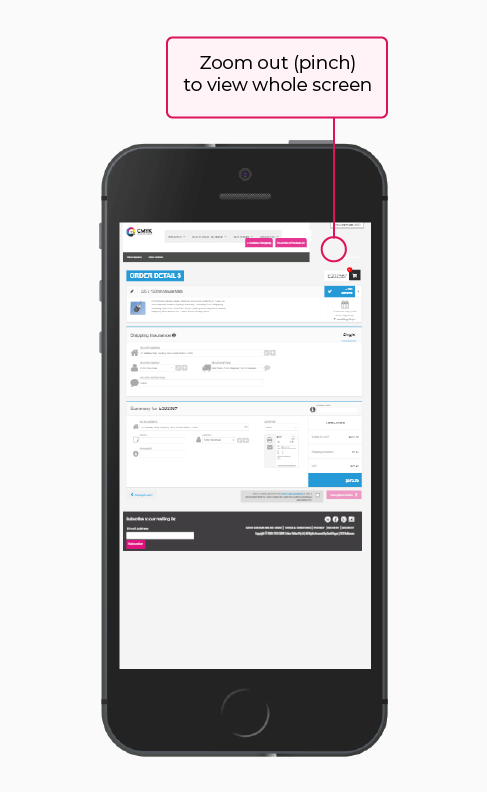
This will take you to the order details page.
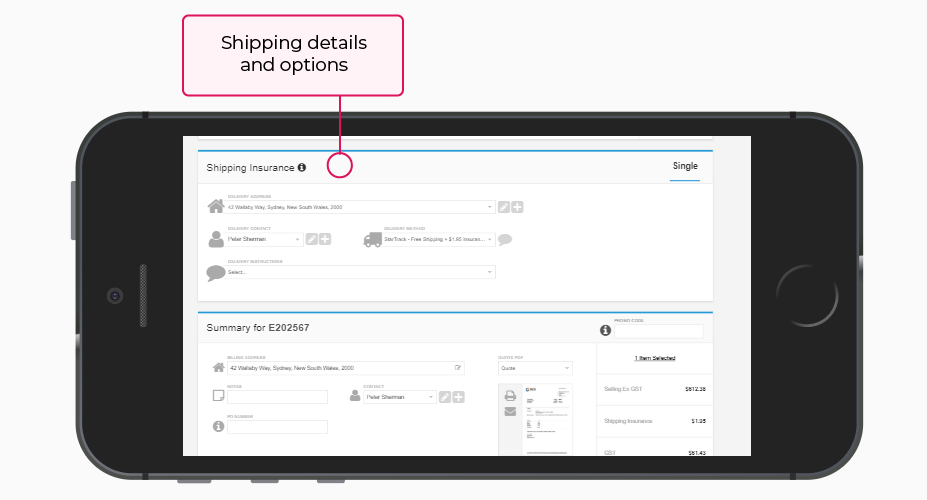
Step 5: Order Details
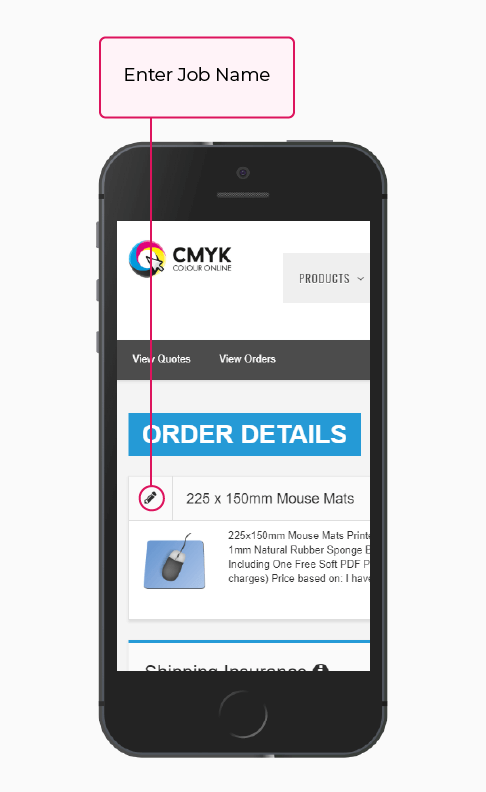
- Select the pencil to change the Job Name.
- Fill out the Shipping/ Delivery details (middle panel) and Billing Details (bottom panel).
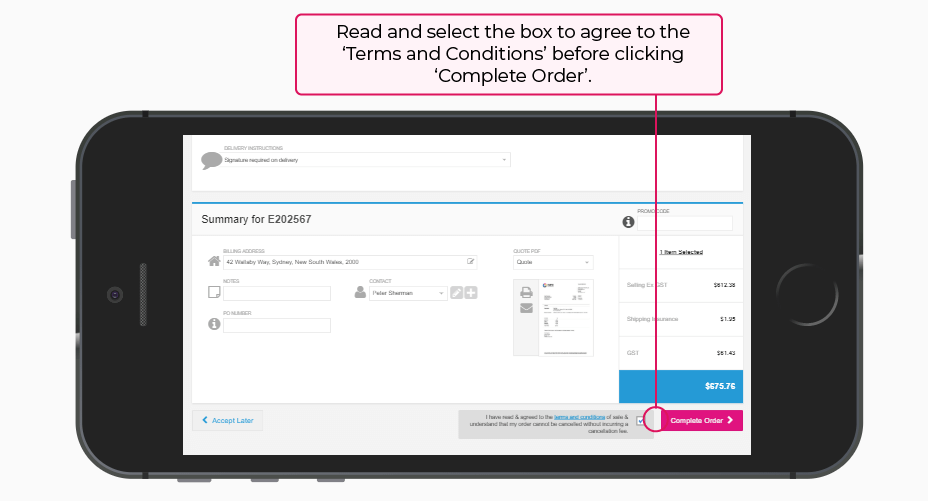
- At the bottom of the page, tap through the link to read the terms and conditions. You must agree with the terms and conditions to proceed with placing an order.
To agree with the terms and conditions please select the check box then tap the ‘Complete Order’ button. This will take you to the payment section.
Step 6: Payment
Here you will be able to pay for your order with either Credit Card or Direct Deposit. Please note that we cannot proceed with your order without first receiving payment.
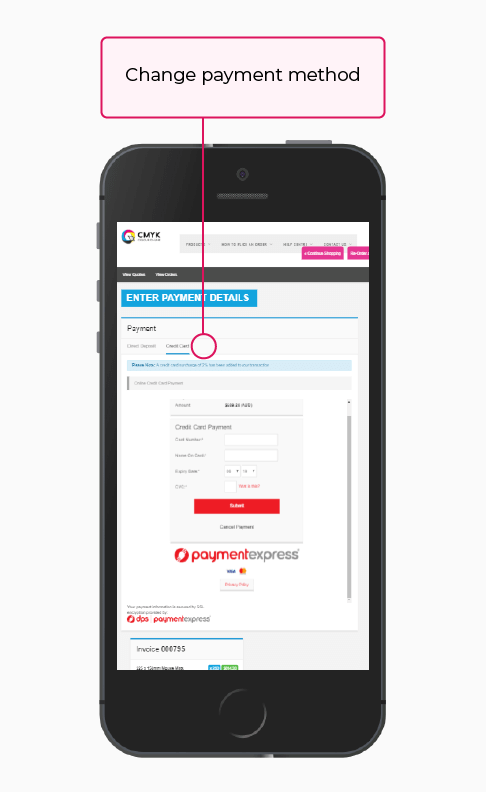
To change payment methods, please tap the other option under ‘Payment’ along the top of the page. The blue underline indicates the selected payment method.
Credit Card:
Enter your Credit Card details & tap the ‘Submit’ button.
Direct Deposit:
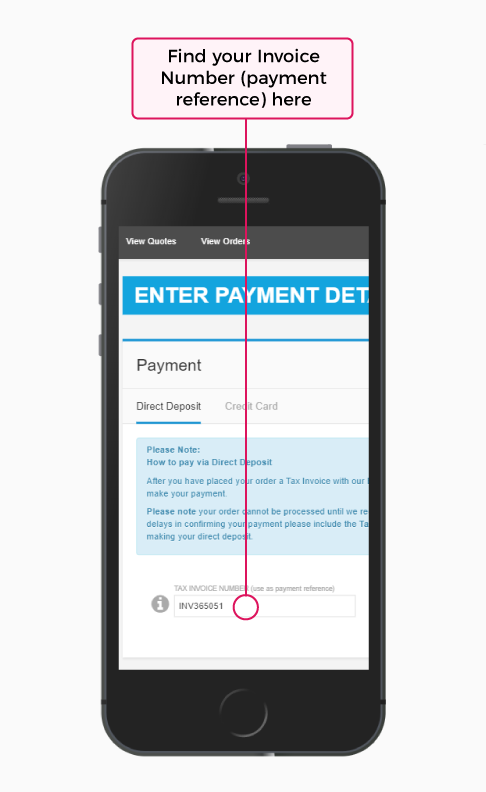
Please carefully read the payment instructions, make a record of the ‘Invoice Number’ (this is your payment reference) and click the ‘Proceed’ button. Banking details will then be emailed to you along with your Tax Invoice.
Please note that Direct Deposit payments can take 1-2 working days for your bank to process. Direct Deposit orders cannot proceed until your funds are confirmed as received by our bank.
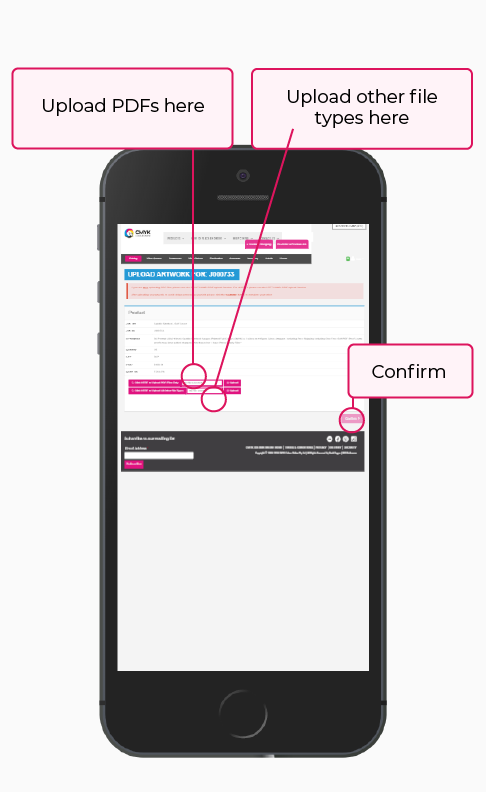
Step 7: Uploading your artwork
On this page you can upload artwork for each item on your order.
- Upload PDFs in the top Artwork Uploader
- Upload other file types in the bottom Artwork Uploader.
Files can be uploaded by tapping on the ‘no file uploaded’ text, navigating to the file you wish to upload on your device and then tap the ‘Upload’ button. Once you’ve uploaded your files tap the ‘Confirm‘ button on bottom right corner of the page.
Please note, if you have selected the ‘I am supply Press Ready files’ option for any item, your artwork needs to meet our Artwork Requirements.
Although PDF’s are our preferred file type, we also accept the following file types:
- Illustrator files (.ai)
- Photoshop files (.psd)
- InDesign files with all links and fonts embedded (.indd or .idml)
- EPS files
- Word Documents (.doc, .docx)[Please note that Microsoft Word does not allow you to save high resolution images. We do not recommend using Word if there are images in your artwork]
- Publisher files (.pub)
- Image file formats (.bmp, .tiff, .jpeg, .png, etc…)
Your order should now be successfully placed.
Once we receive confirmation of your payment, a soft copy PDF proof will be emailed to you for artwork approval.
Please note, your order will not proceed into production until your proof approval is received.
Please click here for instructions on how to approve your proof.
If you are having difficulties placing your order please contact us and a member of our team will reply promptly via email.
